
Updating Data in Firestore from a SwiftUI app
Application Architecture for SwiftUI & Firebase
In this series of articles about SwiftUI and Firebase, we’re building a simple CRUD (Create, Read, Update, Delete) application that allows users to manage their book library.
In previous episodes,
- I showed you how to fetch data from Cloud Firestore in realtime
- we looked at making our apps safer by mapping Firestore documents using Codable
- we discovered how easy it is to add data to Cloud Firestore from a SwiftUI app
The following screen flow diagram gives you an impression of what we’ve achieved so far (in the blue frame):
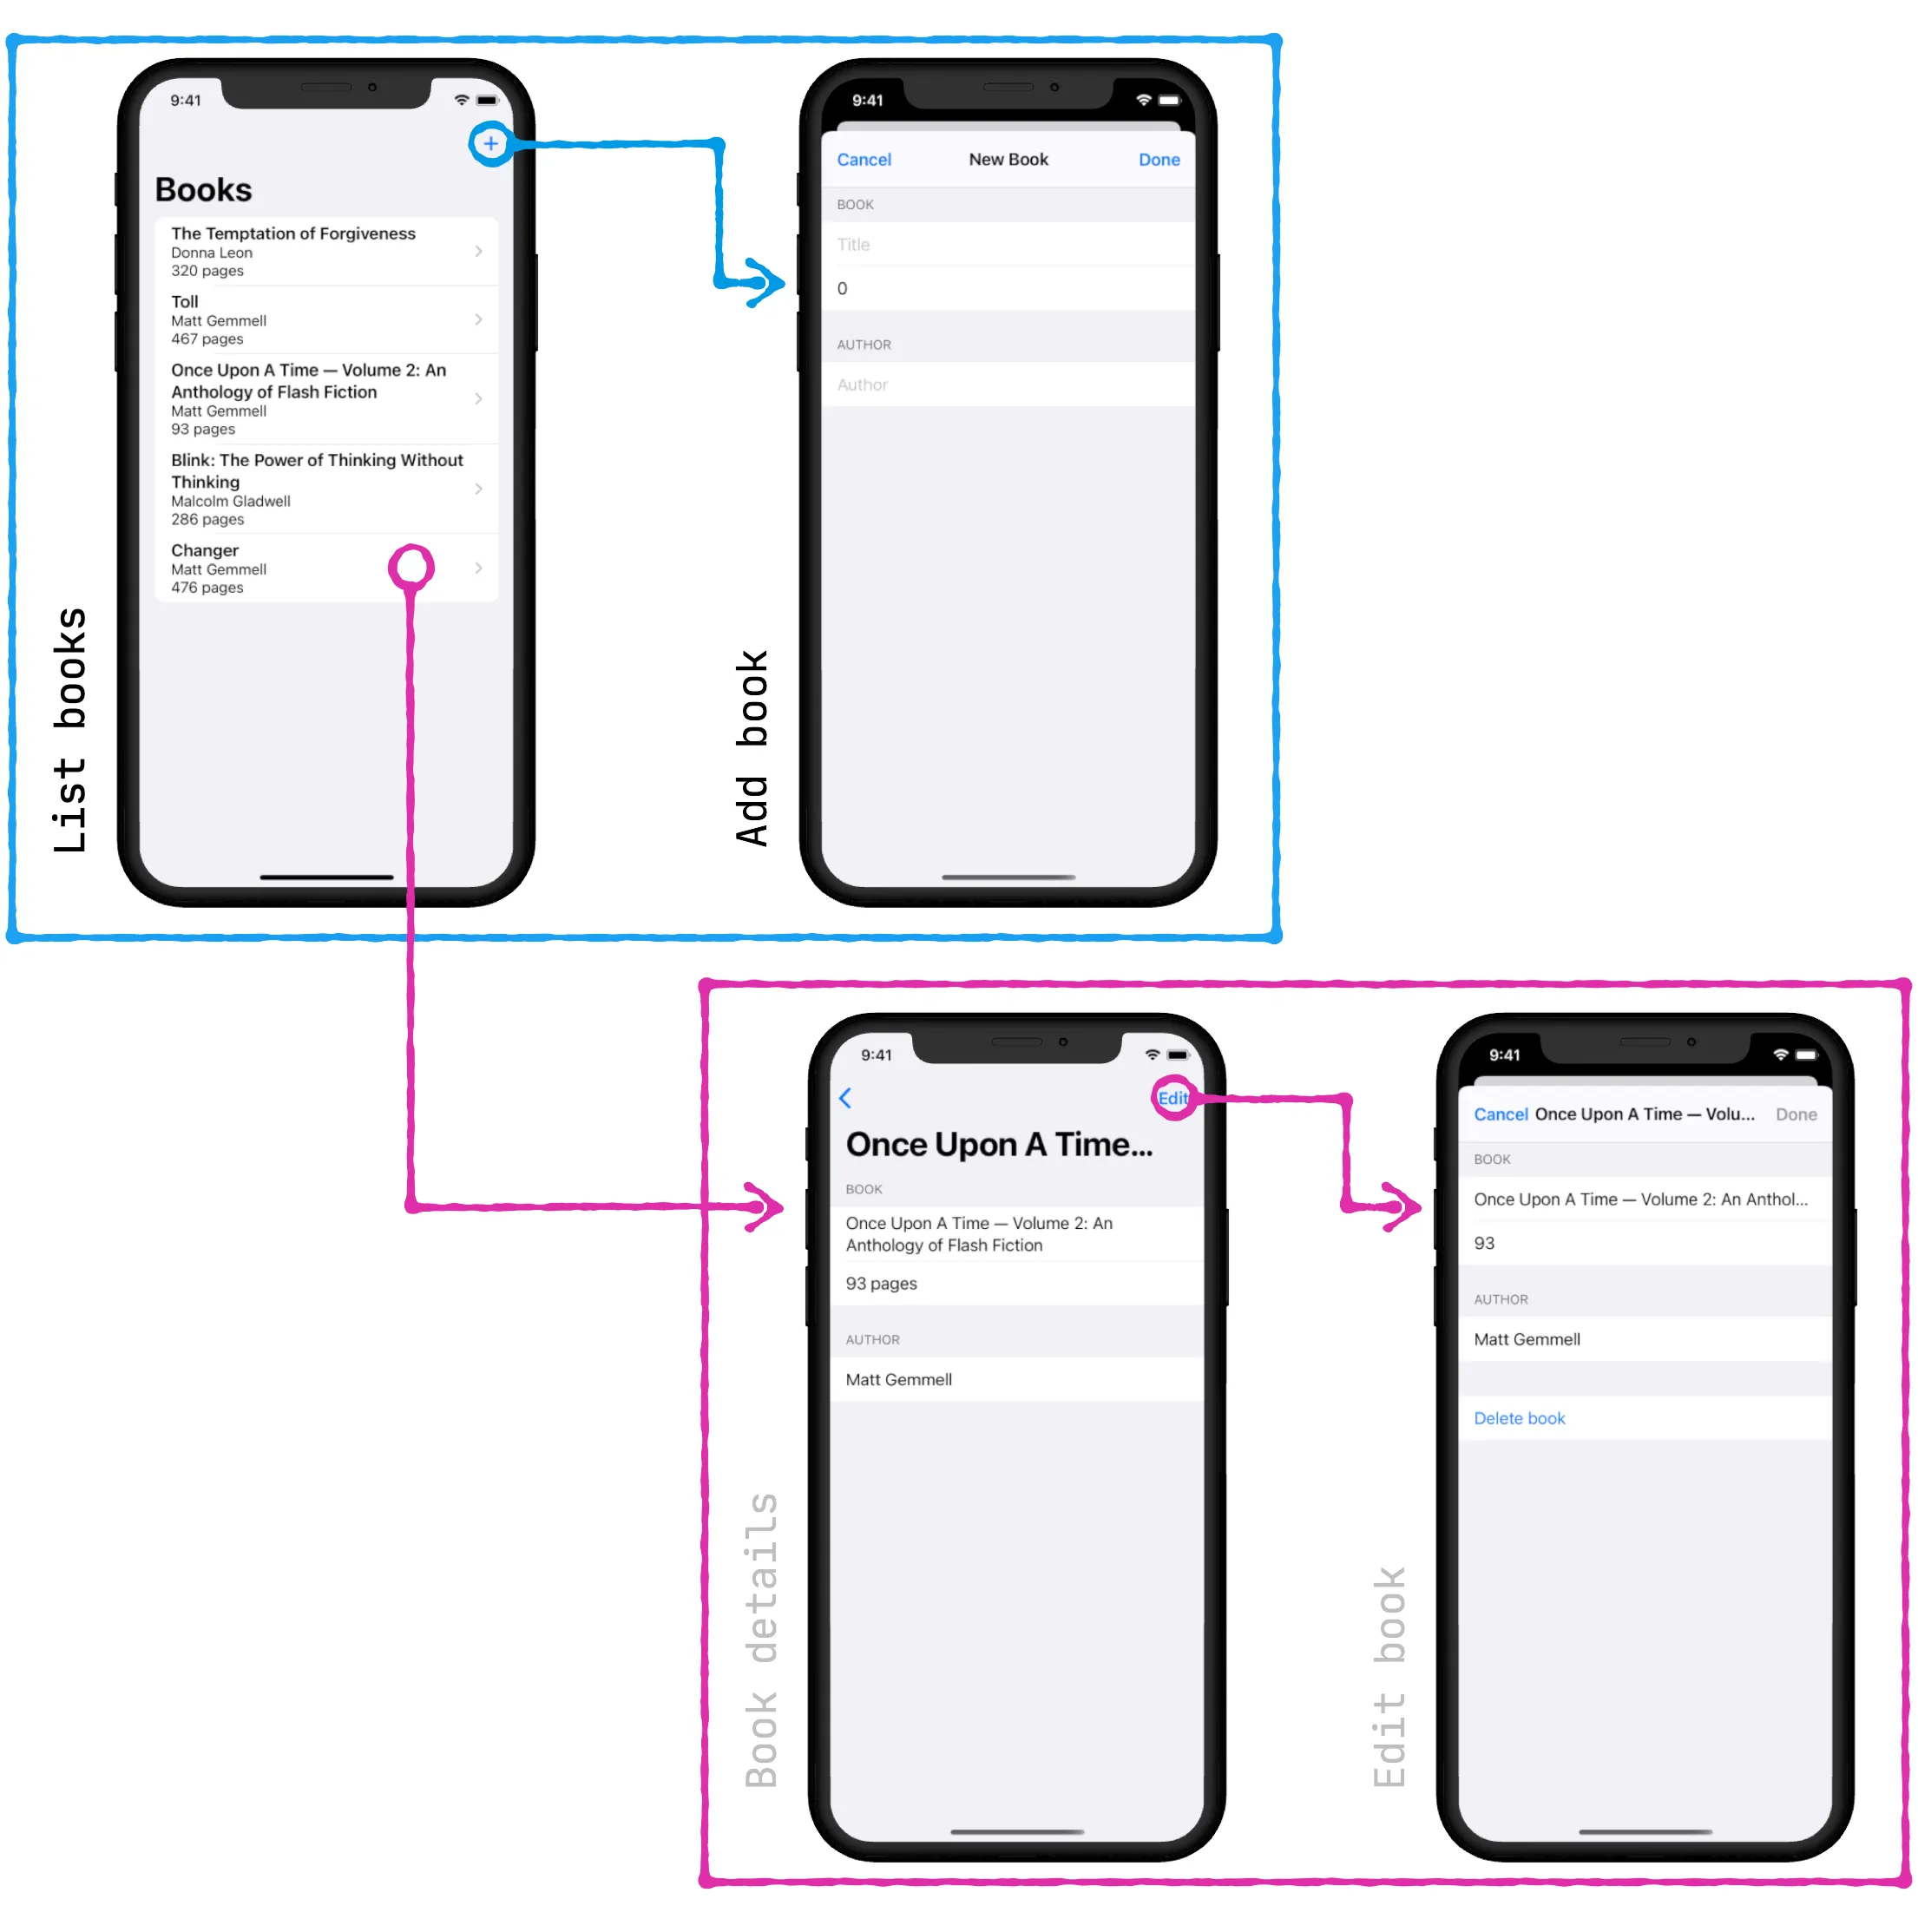
You can use our sample app to add new books and display them in a list view. What’s missing is updating existing books or seeing their details.
In this episode, we’re going to implement the missing screens (in the pink frame) for viewing and editing a book’s details. The result will be a basic CRUD application that you can easily adapt to other data models.
Along the way, you will learn a few things about refactoring SwiftUI code and which strategies can help us re-use code in our views.
Without further ado, let’s get started!
Architectural Overview
The architecture for the sample app follows the MVVM (Model View ViewModel) paradigm. In MVVM apps, the state of a view is determined by the state of the view model(s) it is connected to. Any changes in the view model are reflected in the user interface. The same way, any actions the user takes in the UI will be applied to the view model. The view model, in turn, communicates with any underlying services and your app’s persistence layer.
SwiftUI’s declarative approach and the way it handles state fits well with the ideas of MVVM, and this is one of the reasons why I like to use MVVM when building SwiftUI apps.
Take a look inside - the Book Details screen
This screen presents more details about a book than we might be able to display in the main list view: information like the author, the number of pages, and the book cover. I know - the current version of our app doesn’t support book covers yet - this is something we’re going to implement in a future episode.
The user can navigate to the Book Details screen by tapping on the book row in the main list view. This drill-down navigation is a classic navigation pattern in iOS, and you might be familiar with it from the official Contacts app.
To implement the UI, we’ll make use of the Form view we’ve used in the Add Book screen in one of the previous episodes:
import SwiftUI

struct BookDetailsView: View {
  // MARK: - State

  @Environment(\.presentationMode) var presentationMode

  // MARK: - State (via initialiser)

  var book: Book 1

  // MARK: - UI Components

  var body: some View {
    Form {
      Section(header: Text("Book")) {
        Text(book.title)
        Text("\(book.numberOfPages) pages")
      }

      Section(header: Text("Author")) {
        Text(book.author)
      }
    }
    .navigationBarTitle(book.title)
  }

}

struct BookDetailsView_Previews: PreviewProvider {
  static var previews: some View {
    let book = Book(title: "Changer", author: "Matt Gemmell", numberOfPages: 474)
    return
      NavigationView { 2
        BookDetailsView(book: book)
      }
  }
}
Nothing exciting to write home about - you should be pretty familiar with the UI elements we’re using in this screen.
The only thing I’d like to call out is how we’ve set up the preview: instead of returning BookDetailsView directly, we’ve wrapped it in a NavigationView (2) - this allows us to see how the Book Details view will look like once it is embedded in the overall navigation structure.
To allow users to navigate to this screen by tapping on a book in the main list view, we need to wrap all BookRowViews in the BooksListView list in a NavigationLink:
      List {
        ForEach (viewModel.books) { book in
          NavigationLink(destination: BookDetailsView(book: book)) { 1
            BookRowView(book: book)
          }
        }
      }
If you run the app now, you will notice that everything seems to work fine: the list of books appears, you can add new books, and you can view a book’s details by navigating to the Book Details screen.
However, if you change the details of a book in the Firebase Console, the updates don’t show up in the Book Details screen. They do show up in the list of books on the main screen, though - so what’s wrong?
If you recall how we set up the real-time synchronisation with Firestore in the first episode, you’ll remember that we subscribed to the books collection in Firestore by adding a snapshot listener. We activate this snapshot listener in the .onAppear callback (1) in the main view of the application, BooksListView:
// ...
var body: some View {
    NavigationView {
      List {
        ForEach (viewModel.books) { book in
          BookRowView(book: book)
        }
      }
      // ...
      .onAppear() { 1
        print("BooksListView appears. Subscribing to data updates.")
        self.viewModel.subscribe()
      }
      // by unsubscribing from the view model, we prevent updates coming in from Firestore to be reflected in the UI
      .onDisappear() { 2
        print("BooksListView disappears. Unsubscribing from data updates.")
        self.viewModel.unsubscribe()
      }
     // ...
    }
  }
And just a couple of lines below, we call unsubscribe to deactivate the snapshot listener in the .onDisappear callback (2).
Both .onAppear and .onDisappear are callback methods that allow us to participate in the life cycle of a view - iOS will call them whenever a view appears or disappears.
The intention of unsubscribing from the snapshot listener was to turn off real-time sync whenever the application goes into the background. However, it turns out that .onDisappear will not be called when the application goes into the background. SwiftUI 2 provides a new way to signal when an application goes into the background, and we will take a closer look at this in a separate episode.
Since iOS terminates socket connections (which Firestore uses for its real-time sync feature) when your app enters the background, you won’t receive any real-time updates while the app is backgrounded. Real-time sync will resume automatically once the app returns to the foreground
So to fix the problem that updates do not propagate to the Book Details screen, all we have to do is remove the line which unsubscribes from the snapshot listener.
      // by unsubscribing from the view model, we prevent updates coming in from Firestore to be reflected in the UI
//      .onDisappear() {
//        print("BooksListView disappears. Unsubscribing from data updates.")
//        self.viewModel.unsubscribe()
//      }
Making changes - the Edit Book screen
When we implemented the Add Book screen in the previous episode, I sneakily named it BookEditView, because I knew we’d want to reuse it. As you can see on the screen flow diagram, the screens are reasonably similar, with only a few differences:
| Add Book | Edit Book | |
|---|---|---|
| Confirmation Button | Done | Save |
| Title | New book | (the actual title of the book) |
| Form action button | Delete Book |
SwiftUI comes with a couple of language features that we can apply to use the screen both for adding new books, as well as editing existing ones.
To express the mode we wish to use the screen in, let’s first introduce an enum in BookEditView.swift:
enum Mode {
  case new
  case edit
}
By adding the following line to BookEditView, we define a mode property with a default value of .new.
To indicate whether we want to add a new book or edit an existing one, let’s add the following line to BookEditView:
var mode: Mode = .newSwift will automatically add this to the memberwise initialiser, which will allow us to create an instance of this screen with any of the following calls:
BookEditView(mode: .edit)  // open to edit an existing book
BookEditView(mode: .new) // open to add a new book
BookEditView() // open to add a new book (thanks to default value)
Providing a default value of .new allows us to call the initialiser without a parameter, meaning we won’t have to change our existing code.
This preliminary work allows us to display the views on the screen according to the mode the caller specifies.
Displaying the title according to the screen mode
According to the screen flow diagram and the property table, the screen title should read “New book” if it is in .new mode. If it is in .edit mode, it should display the title of the book we’re editing.
The ternary conditional operator (sometimes referred to as the ternary if statement) provides a great way to implement this requirement.
Replace the following line:
.navigationBarTitle("New book", displayMode: .inline)with the following two lines:
  .navigationTitle(mode == .new ? "New book" : viewModel.book.title)
  .navigationBarTitleDisplayMode(mode == .new ? .inline : .large)
We could have used a ternary conditional operator for both parameters of the navigationBarTitle(_, displayMode) view modifier, but this would have looked a bit messy. Pulling this into two separate statements makes the code easier to read.
Displaying a different title on the Save button
To adapt the title of the Save button according to the screen mode, we will use the same approach:
  Button(action: { self.handleDoneTapped() }) {
    Text(mode == .new ? "Done" : "Save")
  }
  .disabled(!viewModel.modified)
Connect the Edit Book screen to the Book Details screen
The screen flow diagram indicates that users can navigate to the Edit Book screen by tapping the Edit button on the navigation bar of the Book Details screen.
So let’s add this button now to BookDetailsView:
struct BookDetailsView: View {
  // MARK: - State

  @Environment(\.presentationMode) var presentationMode
  @State var presentEditBookSheet = false  1

  // MARK: - State (via initialiser)

  var book: Book

  // MARK: - UI Components

  var body: some View {

    // ...

    .navigationBarTitle(book.title)
    .navigationBarItems(trailing:
      Button(action: { self.presentEditBookSheet.toggle() }) { 2
        Text("Edit")
      }
    )
    .sheet(isPresented: self.$presentEditBookSheet) { 3
      BookEditView(viewModel: BookViewModel(book: book), mode: .edit)
    }
A few words about this code:
- We want to present the Edit Book screen in a modal sheet, so we need to track the presentation state (presented / not presented) of the sheet. The
@StatepropertypresentEditBookSheethelps us do this (1). - To toggle the state of the
presentEditBookSheetproperty, we’ve added aButton(titledEdit) to the navigation bar (2). - And finally, we instruct SwiftUI to show
BookEditViewin a modal sheet on top of the current screen (3).
Updating a book in Firestore
If you run the application now, you will notice that editing a book and saving it will result in a duplicate.
This happens because we call .addDocument(from:) in our view model regardless of whether we’re adding a new book or editing an existing one.
To fix this, we need to introduce a new method on our view model for updating existing books. But how does our view model know whether the user is editing an existing book or adding a new one? There are a couple of options:
- Move the
modeproperty fromBookViewModeltoBookEditView, allowing us to access the mode (.addor.new) from both within the view model and the view. - Inspect the
bookproperty of the view model. If itsidproperty equalsnil, we can safely assume this is a new book that hasn’t been saved to Firestore yet. A non-nilidis a strong indicator that we have fetched thisBookinstance from Firestore before and should update the existing document rather than saving a new one.
I’ve decided to go with option (2), but feel free to implement option (1) and let me know which one you like better.
Here’s the code for updating an existing book:
private func updateBook(_ book: Book) {
  if let documentId = book.id {
    do {
      try db.collection("books").document(documentId).setData(from: book)
    }
    catch {
      print(error)
    }
  }
}
Notice this function is private, as we only want to call it from within the BookViewModel class. Don’t forget to mark addBook(_ book:) as private as well, to prevent anyone from calling it from the outside accidentally.
Let’s now introduce a method that decides whether we need to add a new document or update an existing one:
  private func updateOrAddBook() { 1
    if let _ = book.id {
      self.updateBook(self.book) 2
    }
    else {
      addBook(book) 3
    }
  }
As mentioned before, this method will check (1) if the book property has a non-nil id. If so, the book holds data from an existing document, and we can update the existing document using our updateBook (2) function. Otherwise, we’ll call addBook (3) to create a new document for our book in Firestore.
And finally, we need to update the save() method like this:
  func save() {
    updateOrAddBook()
  }
Deleting a book
If you’ve made it this far - hang in there, we’re almost done! To check off all letters of CRUD (Create, Read, Update, Delete), we just need to implement deleting a book.
As you will see in a minute, allowing users to delete a book from the Edit Book screen poses an unexpected challenge.
But first, let’s add a delete button to the screen.
At the end of the form in BookEditView, insert a new section that contains a single button:
        if mode == .edit {
          Section {
            Button("Delete book") { self.presentActionSheet.toggle() }
              .foregroundColor(.red)
          }
        }
This section is only visible when editing an existing book. After all, deleting a book that hasn’t even been added to Firestore yet doesn’t make any sense!
It is good practice to ask the user for confirmation before performing a destructive operation like deleting a book. A common way to do this is by showing an action sheet. If the user confirms their intent, we can go ahead and delete the book, and then dismiss the screen. We’ll have to update the BookEditView in a couple of locations to achieve this:
struct BookEditView: View {
  @Environment(\.presentationMode) private var presentationMode
  @State var presentActionSheet = false 1

  // ...

  var body: some View {
    NavigationView {
      Form {
        // ...
        if mode == .edit {
          Section {
            Button("Delete book") { self.presentActionSheet.toggle() }  2
              .foregroundColor(.red)
          }
        }

      }
      // ...
      .actionSheet(isPresented: $presentActionSheet) { 3
        ActionSheet(title: Text("Are you sure?"),
                    buttons: [
                      .destructive(Text("Delete book"),
                                   action: { self.handleDeleteTapped() }), 4
                      .cancel()
                    ])
      }
    }
  }

// ...

  func handleDeleteTapped() { 5
    viewModel.handleDeleteTapped()
    self.dismiss()
  }

}
A few notes about this code:
- Depending on the value of the
presentActionSheetproperty (1), the action sheet will be presented (3) - The user can change the state of the
presentActionSheetby tapping the delete button (2), or by dismissing the action sheet. - If the user taps on “Delete book”, we will call
handleDeleteTapped()(4, 5)
To perform the delete operation, we need to add the following code to the BookViewModel:
  private func removeBook() {
    if let documentId = book.id {
      db.collection("books").document(documentId).delete { error in
        if let error = error {
          print(error.localizedDescription)
        }
      }
    }
  }

  // MARK: - UI handlers

  func handleDeleteTapped() {
    self.removeBook()
  }
If you run the application now, you will notice that the user will end up on the Book Details screen for the very book they have just deleted! This behaviour is rather unexpected and confusing. The expected behaviour is to jump back to the main list view instead.
The solution is to also dismiss the Book Details screen when the user deletes a book. Unfortunately, SwiftUI doesn’t offer an elegant mechanism to pop more than one screen at a time - just have a look at how many times this has been asked on Stack Overflow! Someone even came up with their own navigation stack component.
Instead of following this route, I’d like to propose a different solution here: let’s add a completion handler to the Edit Book screen that we can call when the user deletes the book. The parent screen can then decide what to do. In our case, the parent screen is the Book Details screen, so we’ll want to dismiss that screen as soon as the book gets deleted.
Here’s how to implement this. First, we’ll define an enum that lets us express why the completion handler was called. Then, we define a completion handler on the BookEditView.
enum Action {
  case delete
  case done
  case cancel
}

struct BookEditView: View {
  // ...
  var mode: Mode = .new
  var completionHandler: ((Result<Action, Error>) -> Void)?
We use Swift’s Result type to communicate with the parent view, which lets us send one of the Action cases, and allows for optional error handling.
The updated version of handleDeleteTapped makes use of the completionHandler, signalling that the reason for completion was .delete:
  func handleDeleteTapped() {
    viewModel.handleDeleteTapped()
    self.dismiss()
    self.completionHandler?(.success(.delete))
  }
Since the completionhandler is optional, the parent view is free to provide a closure for the completion handler or omit it. Here is the updated call site for BookDetailsView:
    .sheet(isPresented: self.$presentEditBookSheet) {
      BookEditView(viewModel: BookViewModel(book: book), mode: .edit) { result in 1
        if case .success(let action) = result, action == .delete { 2
          self.presentationMode.wrappedValue.dismiss() 3
        }
      }
    }
As you can see, we provide an anonymous closure to handle the callback. Inside the closure, we check whether BookEditView completed successfully, and if so, unwrap the action parameter. If the action equals .delete (2), we dismiss the BookDetailsView (3).
Demo
With everything in place, we can now run the application one more time to verify everything works as intended. Notice how all changes are synced between Firestore and the UI in realtime:
Wrapping up
And with that, we’ve implemented a simple CRUD application using SwiftUI and Firebase!
So far, you have learned:
- How to connect a SwiftUI app to Firestore and synchronise data in realtime
- How to implementing an MVVM architecture helped us to separate concerns and keep our code lean and easy to maintain
- How to Create, Read, Update, and Delete data in Firestore using the Firebase iOS SDK
You can find the source code for the sample application in this GitHub repository. If you’ve got any questions, feel free to file an issue or ping me on Twitter.
You will find the source code for the sample application on GitHub. If you’ve got any questions, feel free to ping me on Twitter at @peterfriese, or open an issue on the GitHub repo.
The header image is based on Upload by Gajah Mada Studio from the Noun Project

Reverse-Engineering Xcode's Coding Intelligence prompt
A look under the hood
Extracting structured data from PDFs using Gemini 2.0 and Genkit
Understanding SwiftUI Preferences
SwiftUI Parent / Child View Communication
Creating a reusable action menu component in SwiftUI

Creating custom SF Symbols using the SF Symbols app
No Design Skills Needed