
Extracting structured data from PDFs using Gemini 2.0 and Genkit
Last week, Google released Gemini 2.0, and after reading this blog post about parsing PDFs using Gemini 2.0, I decided to rebuild the sample using Genkit.
For those who are unfamiliar, Genkit is an AI integration framework that makes implementing AI features for your apps easier.
In this blog post, I am going to focus on Genkit for Node.js, but the team is also working on building support for Go (available in alpha) and Python (under development). This means you can use Genkit on any runtime that supports one of those three languages. The sample app I’m discussing in this blog post is a simple command-line utility that you can run on macOS or any other platform that supports Node.js, but you can also use Genkit on the backend (for example in Cloud Functions for Firebase, Cloud Run, or even - gasp - AWS!
Setup
Before you can use Gemini 2.0 Flash in Genkit, you need to install and add Genkit and the Google AI SDK plugin for Genkit.
You can then instantiate Genkit (1) and define a default model (2). This model will then be used in all subsequent calls you make via the ai instance.
import { gemini20Flash, googleAI } from '@genkit-ai/googleai';
import { genkit, z } from 'genkit/beta';

// instantiate Genkit
const ai = genkit({ 1
  plugins: [googleAI()],
  model: gemini20Flash, 2
});
For a detailed walkthrough of the setup process, check out this video:
Extracting structured data
In this first example, let’s look at how you can use Gemini 2.0 Flash and Genkit to extract structured data from PDFs. Let’s imagine you’ve received a PDF with an invoice. To further process the invoice, you need to extract the invoice number, date, all the line items (including description, amount, and their individual price), as well as the gross price of the invoice.
Thanks to Gemini’s vision capabilities, we can let it handle the OCR for us. The following code snippet shows how to call any LLM via Genkit’s unified generation API, and pass a multimodal prompt (including a URL to the PDF file we want to analyse as well as an instruction).
export async function analyseInvoice(url: string) {
  const { output } = await ai.generate({
    prompt: [
      { media: { url } },
      { text: "Extract the structured data from the following PDF file" }
    ]
  });
  return output;
}
If you’d call this method now for example by passing this URL (which points to an invoice), you’d get the following result:
[
  {
    'Invoice no': '27301261',
    'Date of issue': '10/09/2012',
    Seller: {
      Name: 'Williams LLC',
      Address: '72074 Taylor Plains Suite 342\nWest Alexandria, AR 97978',
      'Tax Id': '922-88-2832',
      IBAN: 'GB70FTNR64199348221780'
    },
    Client: {
      Name: 'Hernandez-Anderson',
      Address: '084 Carter Lane Apt. 846\nSouth Ronaldbury, AZ 91030',
      'Tax Id': '959-74-5868'
    },
    Items: [
      [Object], [Object],
      [Object], [Object],
      [Object], [Object],
      [Object]
    ],
    Summary: {
      'VAT [%]': '10%',
      'Net worth': '494,96',
      VAT: '49,50',
      'Gross worth': '544,46',
      Total: '$ 494,96',
      'Total VAT': '$ 49,50',
      'Total Gross worth': '$ 544,46'
    }
  }
]
Which is pretty impressive - after all, the model was able to correctly extract all information. However, this might not be in the format you need this in.
This is where Genkit’s support for structured output comes in handy. You can define a schema for your data using Zod, like this:
const LineItemSchema = z.object({
	description: z.string(),
	quantity: z.number(),
	grossWorth: z.number(),
});

const InvoiceSchema = z.object({
	invoiceNumber: z.string(),
	date: z.string().describe("The invoice date"),
	items: z.array(LineItemSchema),
	totalGrossWorth: z.number()
});
Then, pass the schema to Genkit’s generate call to enforce this schema.
export async function analyseInvoice(url: string) {
  const { output } = await ai.generate({
    prompt: [
      { media: { url } },
      { text: "Extract the structured data from the following PDF file" }
    ],
    output: {
      schema: InvoiceSchema
    }
  });
  return output;
}
And now, calling the function with the same PDF file will yield the following result:
{
  date: '10/09/2012',
  invoiceNumber: '27301261',
  items: [
    {
      description: 'Lilly Pulitzer dress Size 2',
      grossWorth: 247.5,
      quantity: 5
    },
    {
      description: 'New ERIN Erin Fertherston Straight Dress White Sequence Lining Sleeveless SZ 10',
      grossWorth: 65.99,
      quantity: 1
    },
    {
      description: 'Sequence dress Size Small',
      grossWorth: 115.5,
      quantity: 3
    },
    {
      description: 'fire los angeles dress Medium',
      grossWorth: 21.45,
      quantity: 3
    },
    {
      description: "Eileen Fisher Women's Long Sleeve Fleece Lined Front Pockets Dress XS Gray",
      grossWorth: 52.77,
      quantity: 3
    },
    {
      description: 'Lularoe Nicole Dress Size Small Light Solid Grey/ White Ringer Tee Trim',
      grossWorth: 8.25,
      quantity: 2
    },
    {
      description: 'J.Crew Collection Black & White sweater Dress sz S',
      grossWorth: 33,
      quantity: 1
    }
  ],
  totalGrossWorth: 544.46
}
Since this adheres to the schema we provided, it will be much easier to process.
Gemini 2.0 Flash supports structured output, but even if you’re using an LLM that doesn’t support natively structured output, Genkit can help by augmenting the prompt and coercing the returned data for you. What’s really amazing about this: you won’t have to change your code, thanks to Genkit’s unified generation API (check out this thread on Bluesky in which I demonstrate this).
Parsing hand-written form input
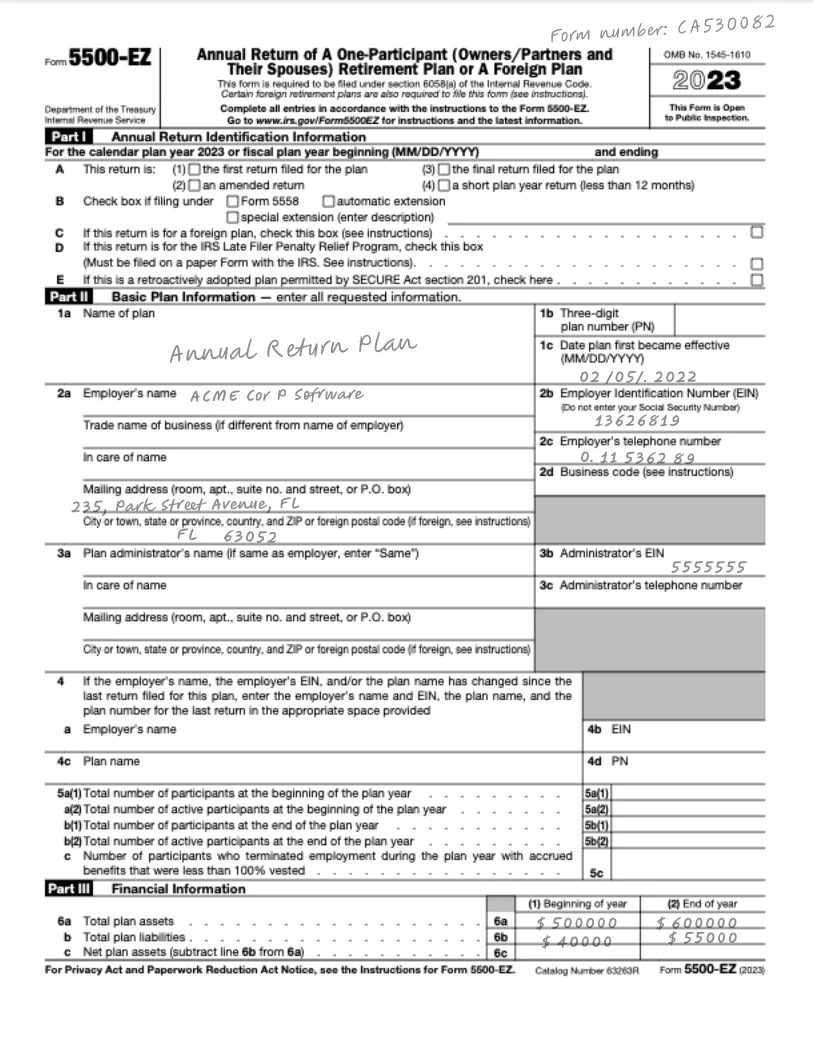
I mentioned Gemini’s OCR capabilities, so let’s try extracting the hand-written entries in the following PDF:
One way to achieve this would be to define a new schema and then call Genkit’s generate method using this new schema. But there is a more flexible way to do this. It turns out that the actual code for calling Gemini to extract data from a PDF is always the same - only the output format (and potentially the instructions) change for each type of PDF we want to analyse.
So why not make this a bit more generic?
Managing prompts
Genkit provides a way to extract prompts into external files, using the Dotprompt library. This allows you to keep your code free from any prompt, making it easier to change the prompt independently of the code.
Let’s first define a prompt file:
---
model: googleai/gemini-2.0-flash
input:
  schema:
    pdfUrl: string
  default:
    pdfUrl: "https://storage.googleapis.com/generativeai-downloads/data/pdf_structured_outputs/handwriting_form.pdf"
output:
  schema:
    formNumber: string, Handwritten Form Number
    startDate: string, Effective Date of the plan
    beginningOfYear: integer, The plan liabilities beginning of the year
    endOfYear: integer, The plan liabilities end of the year
    name: string, Name of the plan
    address: string, Mailing address
    phoneNumber: string, Employer's phone number
    ein: string, Employer Identification Number
---
Extract the hand-written form data.

{{media url=pdfUrl}}
This prompt file defines the model Genkit should use (Gemini 2.0 Flash), as well as the prompt itself. But it also specifies the input and output schemas for the prompt. For example, under input/schema, we define an input parameter named pdfUrl of type string, which can then be used in the prompt to pass the URL. Likewise, under output/schema, we define all the keys we want to extract from the PDF file, including their types. Note that the descriptions of the keys do not just serve the purpose of documentation - Genkit will use them in the prompt to specifically tell the model how to find the data for the respective keys.
Prompting the model
To load a prompt from a file, use ai.prompt(filename) (1). This has a beneficial side effect: we can now create .prompt files for all the different types of data we want to extract from PDF files, and just pass the filename to the extract function:
export async function extract(promptName: string, pdfUrl: string) {
  const prompt = ai.prompt(promptName); 1
  const { output } = await prompt({ pdfUrl }); 2
  return output;
}
Instead of using ai.generate() to call the LLM, you can execute a prompt by caling the prompt itself, and passing the required parameters (2).
Calling this method using extract("form", "https://storage.googleapis.com/generativeai-downloads/data/pdf_structured_outputs/handwriting_form.pdf") will yield the following result:
{
  address: '235, Park Street Avenue, FL',
  beginningOfYear: 40000,
  ein: '13626819',
  endOfYear: 55000,
  formNumber: 'CA530082',
  name: 'Annual Return Plan',
  phoneNumber: '0.11 536289',
  startDate: '02/05/.2022'
}
Which - if you ask me - is mind-boggling.
Where to go from here
To learn more about Genkit, check out the documentation. Also, feel free to drop by my weekly livestreams - I’m currently working on implementing a Second Brain app, and I’m using Genkit for some of the AI-powered features.

Agentic Coding in Xcode with Gemini CLI
Build apps with AI assistance in Xcode using Gemini CLI

Turn Your Photos Into Miniature Magic with Nano Banana
Build stunning image generation apps in iOS with just a few lines of Swift

Reverse-Engineering Xcode's Coding Intelligence prompt
A look under the hood

Understanding SwiftUI Preferences
SwiftUI Parent / Child View Communication