
Adding Data to Firestore from a SwiftUI app
Application Architecture for SwiftUI & Firebase
Previously in this series of articles about SwiftUI and Firebase, we talked about fetching data from Cloud Firestore and how to map from Firestore documents to Swift structs using Swift’s Codable API.
You might recall that we also introduced a way to add new books to our collection of books in Firestore. To do so, we added a method addBook(book:) to our view model. However, we didn’t actually use it, as we didn’t have a UI in place for entering the details about the new book.
So today, let’s look at how to build UI for adding a new book and how to update our view models to support this use case.
Don’t judge a book by its cover
Before we jump into the implementation details, let’s consider for a moment how the UI for our application will look like. You will notice that the overall structure is pretty similar to the iOS Contacts app.
Take a look at the following diagram which shows all the screens of our application.
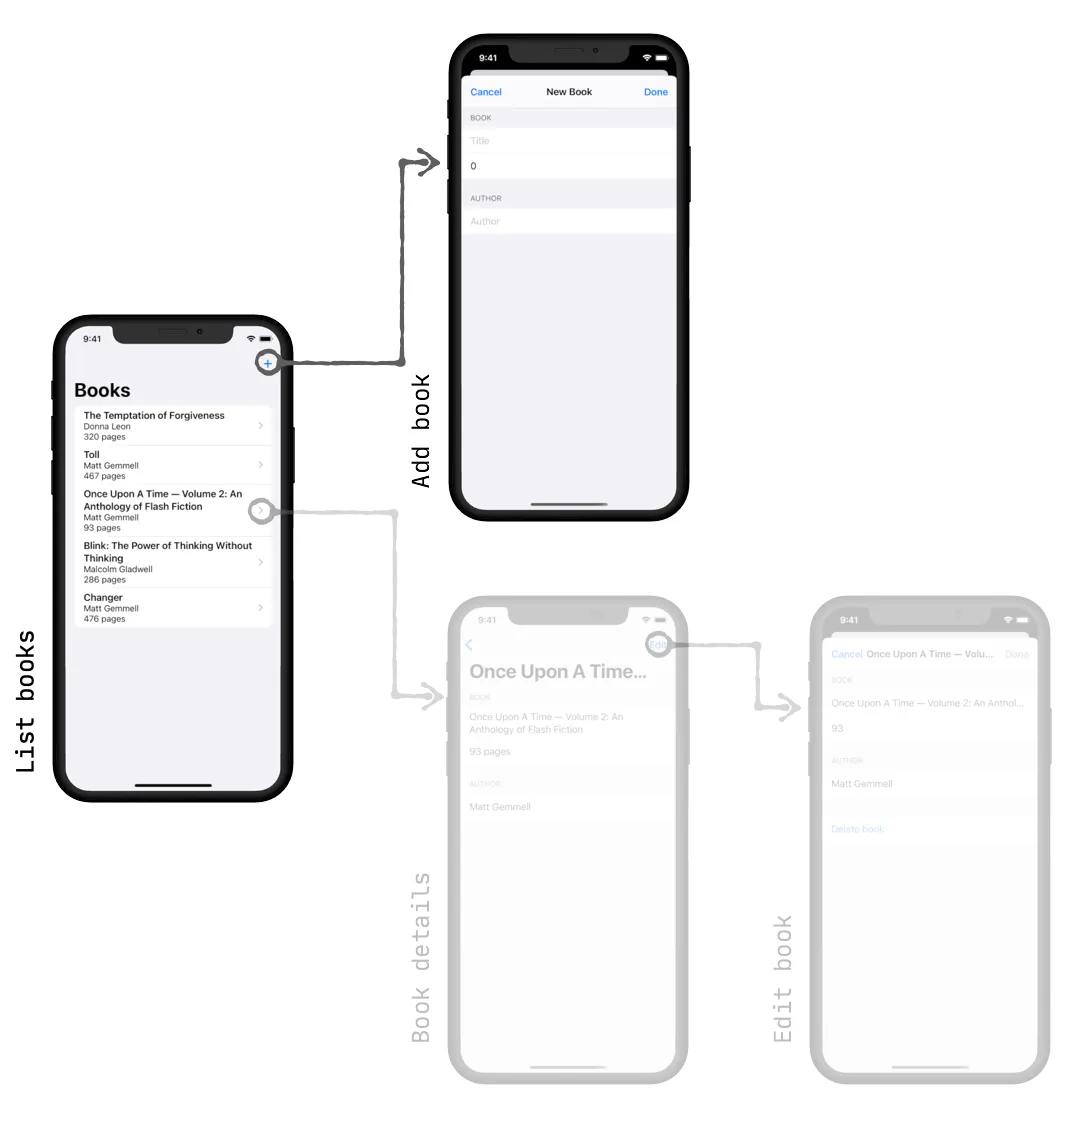
(The greyed-out parts of the diagram will be covered in the following episodes of this series, when we work on completing the app by implementing all the other CRUD (Create, Read, Update, Delete) features).
The books list screen is the centerpiece of the application - it shows a list of all the user’s books. Tapping on a list item will take the user to a screen that will display the details of the respective book. We will implement the book details screen in one of the next episodes, re-using some of the code we’re going to build today.
By tapping on the + button in the navigation bar, the user can add a new book. This will take them to a screen that will allow them to enter the details of a new book, such as the title or the number of pages. Tapping Done will add the book to the collection of books and dismiss the screen. If the user decides they don’t want to add a new book after all, they can tap the Cancel button which will just dismiss the dialog. We will use SwiftUI’s Forms API along with a number of TextFields to implement this screen.
To implement the Add a new book use case, we will need the following:
- The UI for the screen. This will be a SwiftUI view.
- A view model for handling the new screen’s state.
- A button in the navigation bar of the book list screen to allow the user to open the New Book screen
Building the UI
Let’s start by sketching out the UI. Here is the bare bones version of our Add a new book screen:
import SwiftUI

struct BookEditView: View {
  @Environment(\.presentationMode) private var presentationMode 1
  @StateObject var viewModel = BookViewModel() 2

  var body: some View {
    NavigationView {
      Form {
        Section(header: Text("Book")) { 3
          TextField("Title", text: $viewModel.book.title) 4
          TextField("Number of pages", value: $viewModel.book.numberOfPages, formatter: NumberFormatter()) 5
        }

        Section(header: Text("Author")) { 6
          TextField("Author", text: $viewModel.book.author) 7
        }
      }
      .navigationBarTitle("New book", displayMode: .inline)
      .navigationBarItems(
        leading:
          Button(action: { self.handleCancelTapped() }) {
            Text("Cancel")
          },
        trailing:
          Button(action: { self.handleDoneTapped() }) {
            Text("Done")
          }
          .disabled(!viewModel.modified) 8
        )
    }
  }

  func handleCancelTapped() { 9
    dismiss()
  }

  func handleDoneTapped() { 10
    self.viewModel.handleDoneTapped()
    dismiss()
  }

  func dismiss() { 11
    self.presentationMode.wrappedValue.dismiss()
  }
}
A few notes on how this code works:
- As the screen is going to be displayed modally, we’ll want to be able to dismiss it when the user taps on the Done or Cancel button. The presentation state is managed via the
presentationModeenvironment variable, which we bind in (1). We introduce a helper methoddismiss()(11) to make it a little bit easier to dismiss the screen from the action handler methodshandleCancelTapped()(9) andhandleDoneTapped()(10). - We instantiate the view model (2) so we can bind the individual UI elements to it. Note that we’re using
@StateObjectproperty wrapper here, which is new in iOS 14 / Xcode 12b1. - The main part of the screen is taken up by a form with two sections: one for the book details (3), the other for the name of the author (6).
- The individual text fields are bound to the view model (4, 5, 7)
- You will notice that the text field for the number of pages looks slightly different: as the underlying data type is a number, we’re using a
NumberFormatterto convert the user input (which is a string) into a number, and vice versa. Invalid input (anything other than a number) will be rejected. Please note that, as of now, you need to press [Enter] to commit any input in aTextFieldthat uses aFormattersubclass. This likely is Apple’s attempt to minimize the number of times the formatter needs to run. - Since it only makes sense to save the book in Firestore once the user has entered some text, we only enable the Done button if the view model is modified (8)
The View Model
The BookViewModel manages the state of our Add a new book screen. Its responsibilities are:
- Providing access to the book the user is editing
- Keeping book of the book’s state, so we can enable / disable the Done button on the UI
- Saving the new book to Firestore
Let’s take a closer look at the following code:
import Foundation
import Combine
import FirebaseFirestore

class BookViewModel: ObservableObject {
  // MARK: - Public properties

  @Published var book: Book 1
  @Published var modified = false

  // MARK: - Internal properties

  private var cancellables = Set<AnyCancellable>()

  // MARK: - Constructors

  init(book: Book = Book(title: "", author: "", numberOfPages: 0)) { 2
    self.book = book

    self.$book 3
      .dropFirst() 5
      .sink { [weak self] book in
        self?.modified = true
      }
      .store(in: &self.cancellables)
  }

  // MARK: - Firestore

  private var db = Firestore.firestore()

  func addBook(_ book: Book) {
    do {
      let _ = try db.collection("books").addDocument(from: book)
    }
    catch {
      print(error)
    }
  }

  // MARK: - Model management

  func save() {
    addBook(self.book)
  }

  // MARK: - UI handlers

  func handleDoneTapped() {
    self.save()
  }

}
The view model has two published properties, which we subscribed to in the UI:
book(1) is the book that the user is currently editing / adding. If you look back at the code for the UI, you will notice that the individualTextViews bind to the respective attributes of theBookinstance. Any change in the UI will be reflected in thebookinstance, and vice versa.- We provide an empty
Bookinstance as the default parameter for the constructor (2) to make creating the view model a little bit less verbose. - To keep track of the modification state of the
bookattribute, we set up a simple Combine pipeline (3) that will setmodifiedto true (4) as soon as thebookmodel is modified. To prevent the view model from being marked as modified when initially setting thebookinstance, we drop the first event (5). Side note: this code doesn’t mark the view model as unmodified if the user undoes all modifications, which is an obvious shortcoming. I’ll leave the implementation of a more robust change detection to the keen reader :-)
The view model not only holds the state for our UI, but also provides action handlers that can be called by the UI. The only action handler in this case is handleDoneTapped(), which will store the book instance into Firestore.
And finally, addBook will store the book attribute into the books collection in our Firestore instance. If you’ve read the previous episode, you will recognise this method.
Putting it all together
Now that we’ve got the UI for editing a new book and the view model for managing the view state, all that’s missing is a button to open the Add a new book screen.
First, let’s define the button itself:
struct AddBookButton: View {
  var action: () -> Void
  var body: some View {
    Button(action: { self.action() }) {
      Image(systemName: "plus")
    }
  }
}
And then use it in the BookListView we built in the previous episode:
struct BooksListView: View {
  @StateObject var viewModel = BooksViewModel()
  @State var presentAddBookSheet = false 1

  var body: some View {
    NavigationView {
      List {
        ForEach (viewModel.books) { book in
          BookRowView(book: book)
        }
      }
      .navigationBarTitle("Books")
      .navigationBarItems(trailing: AddBookButton() { 2
        self.presentAddBookSheet.toggle() 3
      })
      .sheet(isPresented: self.$presentAddBookSheet) { 4
        BookEditView() 5
      }

    }
  }
}
Here’s how it works:
- The Add new book screen will be displayed in a modal sheet (5) which will only be shown if the boolean
presentAddBookSheetis true (1, 4) - The button we defined above is added to the navigation bar (2)
- When the user presses the button, the boolean
presentAddBookSheetis toggled (3), and the Add a new book screen will be shown
Demo
With all these pieces in place, we can now run the application. Any book we add using BookEditView will be added to Firestore (use the Firebase console to watch this)), and will instantly show up in the list of books in BooksListView.
Conclusion
In this episode, we looked at how to add new data to Cloud Firestore, and how to integrate this in a SwiftUI app that follows the MVVM approach.
You learned:
- How to map data from a Swift struct to a Cloud Firestore document by using Swift’s Codable protocol
- How to use a View Model to encapsulate data access and make managing our view state easier, resulting in a cleaner and more maintainable code base
- How to tie this all together to make sure our application state is always in sync both with our backend and within the frontend
In the next episode, we will work on completing the main functionality of our application by implementing functionality to update and delete books. In addition to implementing a details screen and integrating it with our navigation structure, we will also look at the flow of data and talk about refactoring our code to keep all data access code in one place.
Thanks for reading, and make sure to check out the Firebase channel on YouTube, where you will find a video version of this article.
If you’ve got any questions or comments, feel free to post an issue on the GitHub repo for this project, or reach out to me on Twitter at @peterfriese.

Reverse-Engineering Xcode's Coding Intelligence prompt
A look under the hood
Extracting structured data from PDFs using Gemini 2.0 and Genkit
Understanding SwiftUI Preferences
SwiftUI Parent / Child View Communication
Creating a reusable action menu component in SwiftUI

Creating custom SF Symbols using the SF Symbols app
No Design Skills Needed