
Using async/await in SwiftUI
Swift Evolution
Note !
As of WWDC 2021, async/await and many other features of Swift Concurrency are now available in Swift 5.5, as part of Xcode 13b1. Some of the information presented in this article is now out-of date, but the general priciples still apply. I’ve published an up-to-date introduction to using Swift Concurrency and async/await in SwiftUI here: Getting Started with async/await in SwiftUI
A lot of the code we write has to deal with asynchronous behaviour. Fetching data from the disk, sending a request to a remote API, or downloading an image - all these operations take time, even on your super-fast, low-latency working-from-home network.
A simple way of dealing with this is to just wait until a call has finished and the data we requested has arrived. The problem with this approach is that your app’s UI will freeze while it’s waiting. We’ve all used apps that seem to completely freeze up for certain tasks - it’s a terrible user experience.
So how can we do better?
One way is to perform long-running tasks on a background thread and call back into the main application once the result has arrived. There are a number of ways to implement this. As iOS developers, we’re familiar with delegates: you make a call to a method, and a few moments later you will receive the result on one of the delegate methods. This works well, but the resulting code is spread out all over the place and rather hard to read.
Closures provide a slightly more elegant way to write asynchronous code. Let’s look at some pseudocode for a real-world example: ordering a meal in a restaurant.
chatWithFriends()
placeOrder(theOrder) { meal in
  eat(meal)
}
The important thing here is that you can continue chatting with your friends while waiting for your order to arrive. The code in curly braces after the call to placeOrder is called a trailing closure, and it is only called once the meal has been prepared and is delivered to your place.
This is very different from synchronous code, where the computer executes one statement after the other in a sequential order. The following pseudocode is much more similar to how we perceive this situation:
placeOrder(theOrder)
chatWithFriends()
meal = receiveMeal()
eat(meal)- We place the order
- Then, while we’re waiting for the meal to arrive, we chat with our friends
- After a little while the meal arrives, and we can enjoy it
Using closures and callbacks to deal with asynchronous code is common these days, and many iOS SDKs, such as Alamofire, AWS Amplify, Firebase, and even Apple’s very own URLSession make use of it.
However, once you try to coordinate several asynchronous calls, this kind of code can quickly become hard to read, and - what’s worse - difficult to get right. Wouldn’t it be nice if we were able to write asynchronous code in a way that looks similar to the second code snippet?
The good news is, we can - the Swift team has proposed an addition to the Swift language that will allow us to do just that. The proposal is named SE-0296, and is available in the development snapshots of the Swift compiler toolchain. It adds support for async/await to Swift, which will allow us to make asynchronous calls without using callbacks.
In this article, I am going to show you how to install the compiler toolchain, activate this new feature, and rewrite a callback-based code snippet to make use of async/await.
Installing the experimental compiler toolchain
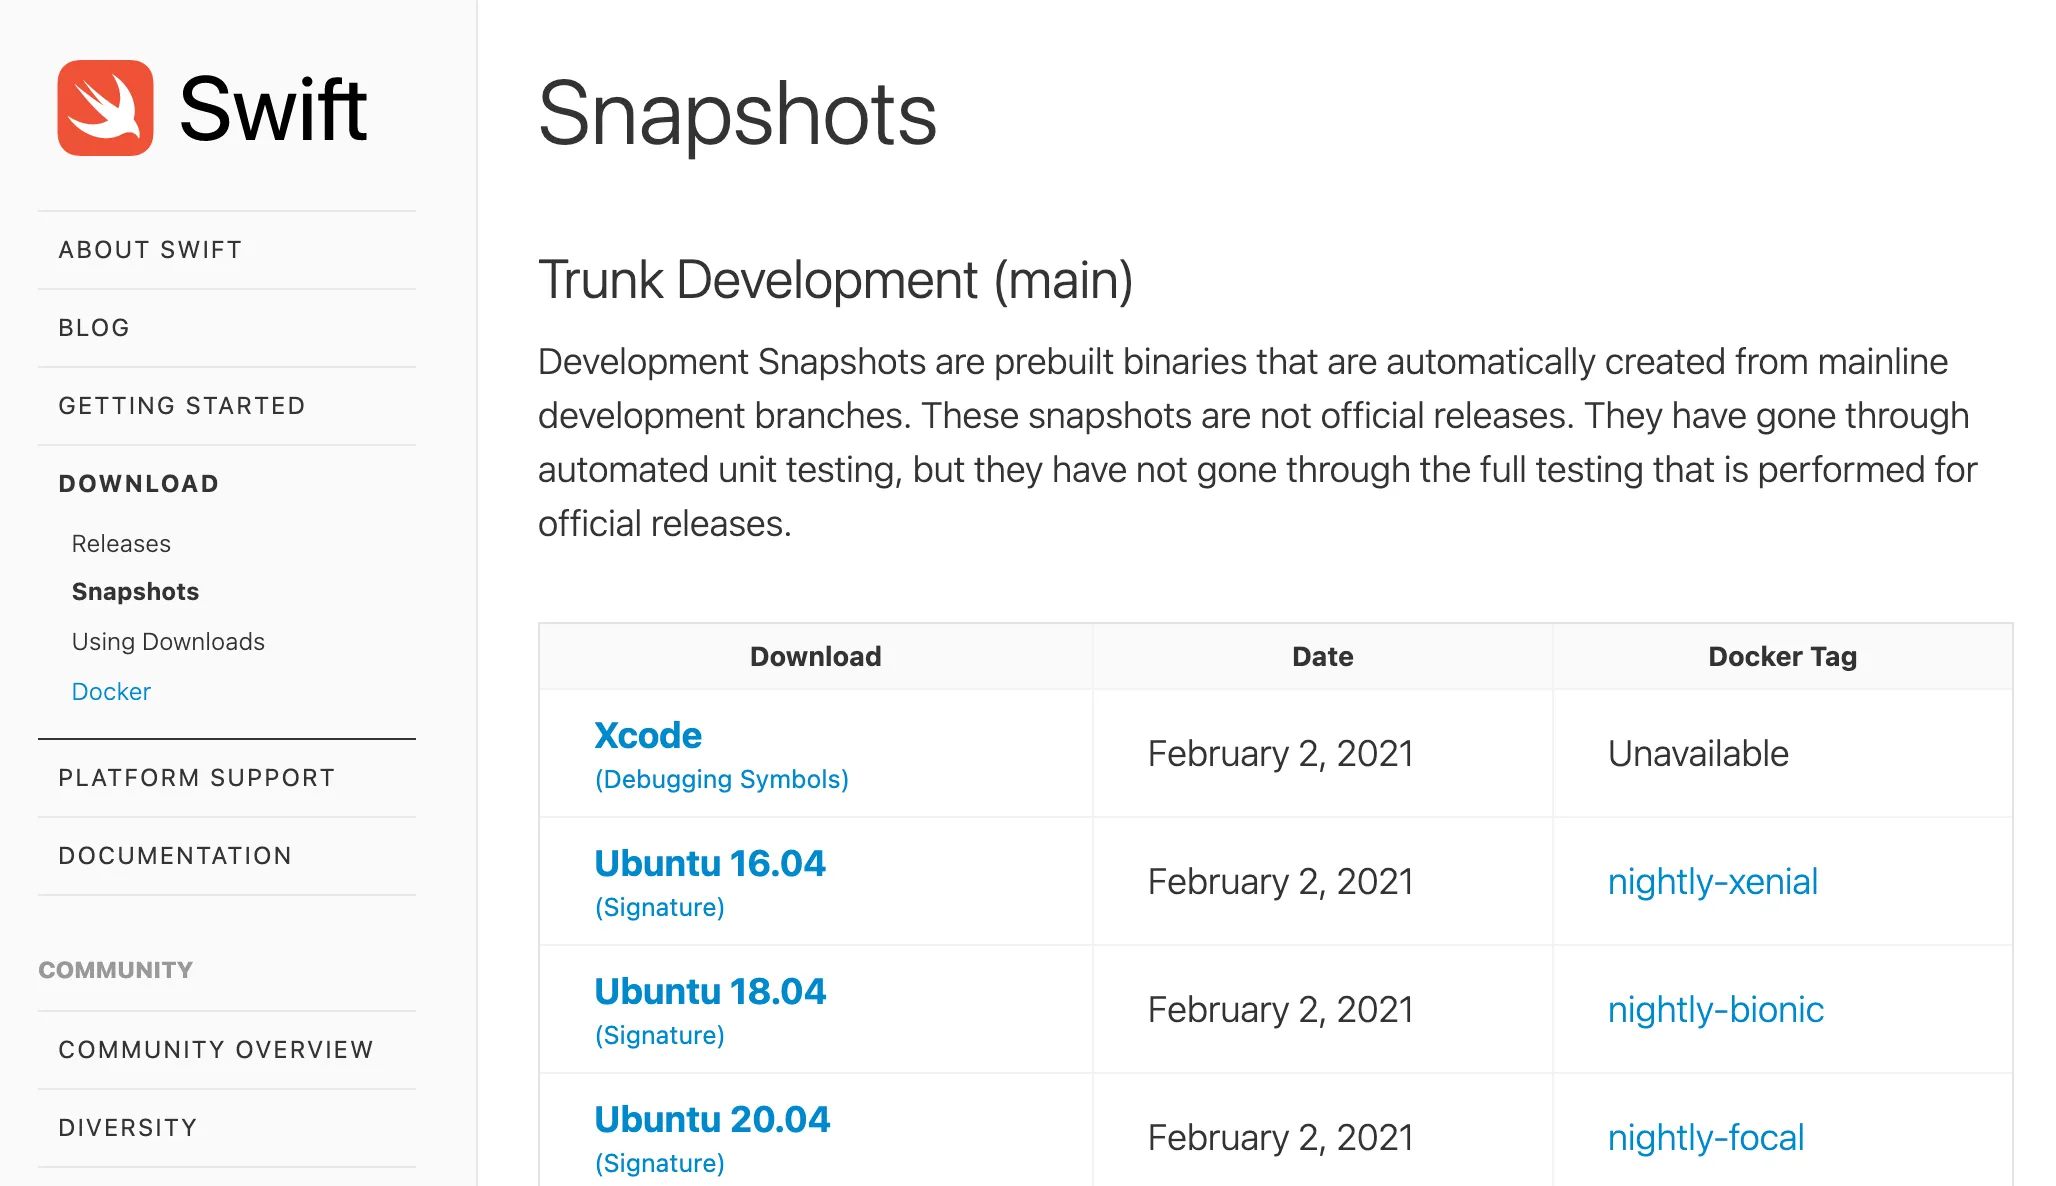
To experiment with this feature, we first need to download the Swift compiler toolchain from the downloads page on the Swift website. Scroll down to the Trunk Development (main) section and click on the Xcode link. The link title is a bit misleading - the download doesn’t actually contain a copy of Xcode. It’s really just the compiler toolchain.
After the download has finished, we can install it by double-clicking the package.
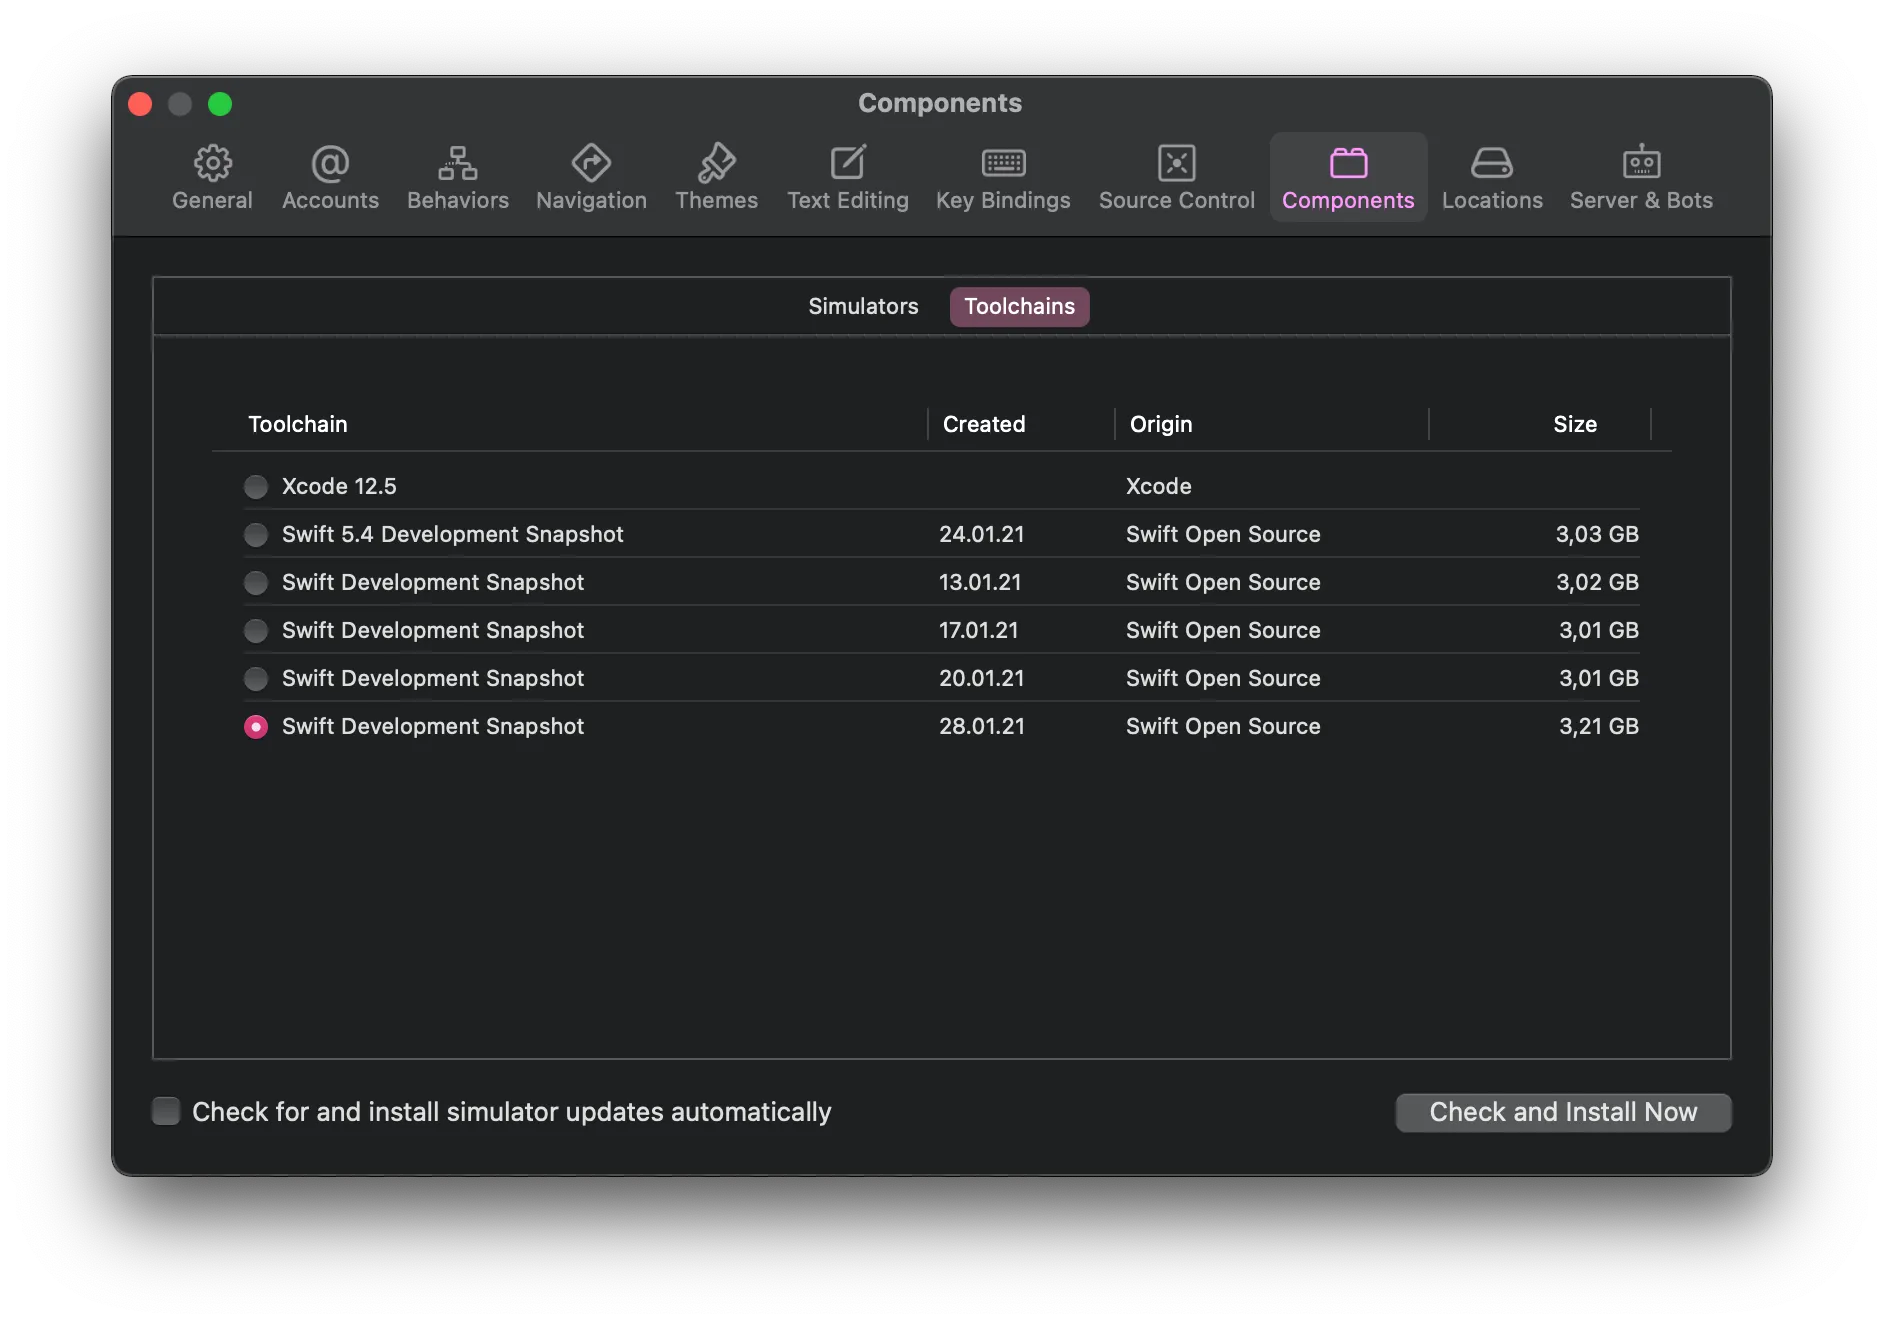
To activate the compiler toolchain, we need to launch Xcode and select the toolchain. Go to Preferences > Components > Toolchains, and select Swift Development Snapshot. In this dialog, you’ll also see the official toolchain - it’s labelled Xcode 12.5. Don’t forget to switch back to this original toolchain when you’re going back to working on your work projects.
Once the toolchain is activated, Xcode will display a blue chain icon in the status area:

It’s worth keeping in mind that this is an experimental feature, and things might change between now and when it is launched. Most importantly, it is not possible to ship builds to the App Store using the experimental toolchain. You also can’t run on a real device, just on the Simulator. So - don’t use this in your production code.
Enabling experimental support for concurrency
Before we can make use of async/await, we need to enable experimental concurrency in the build settings for our project.
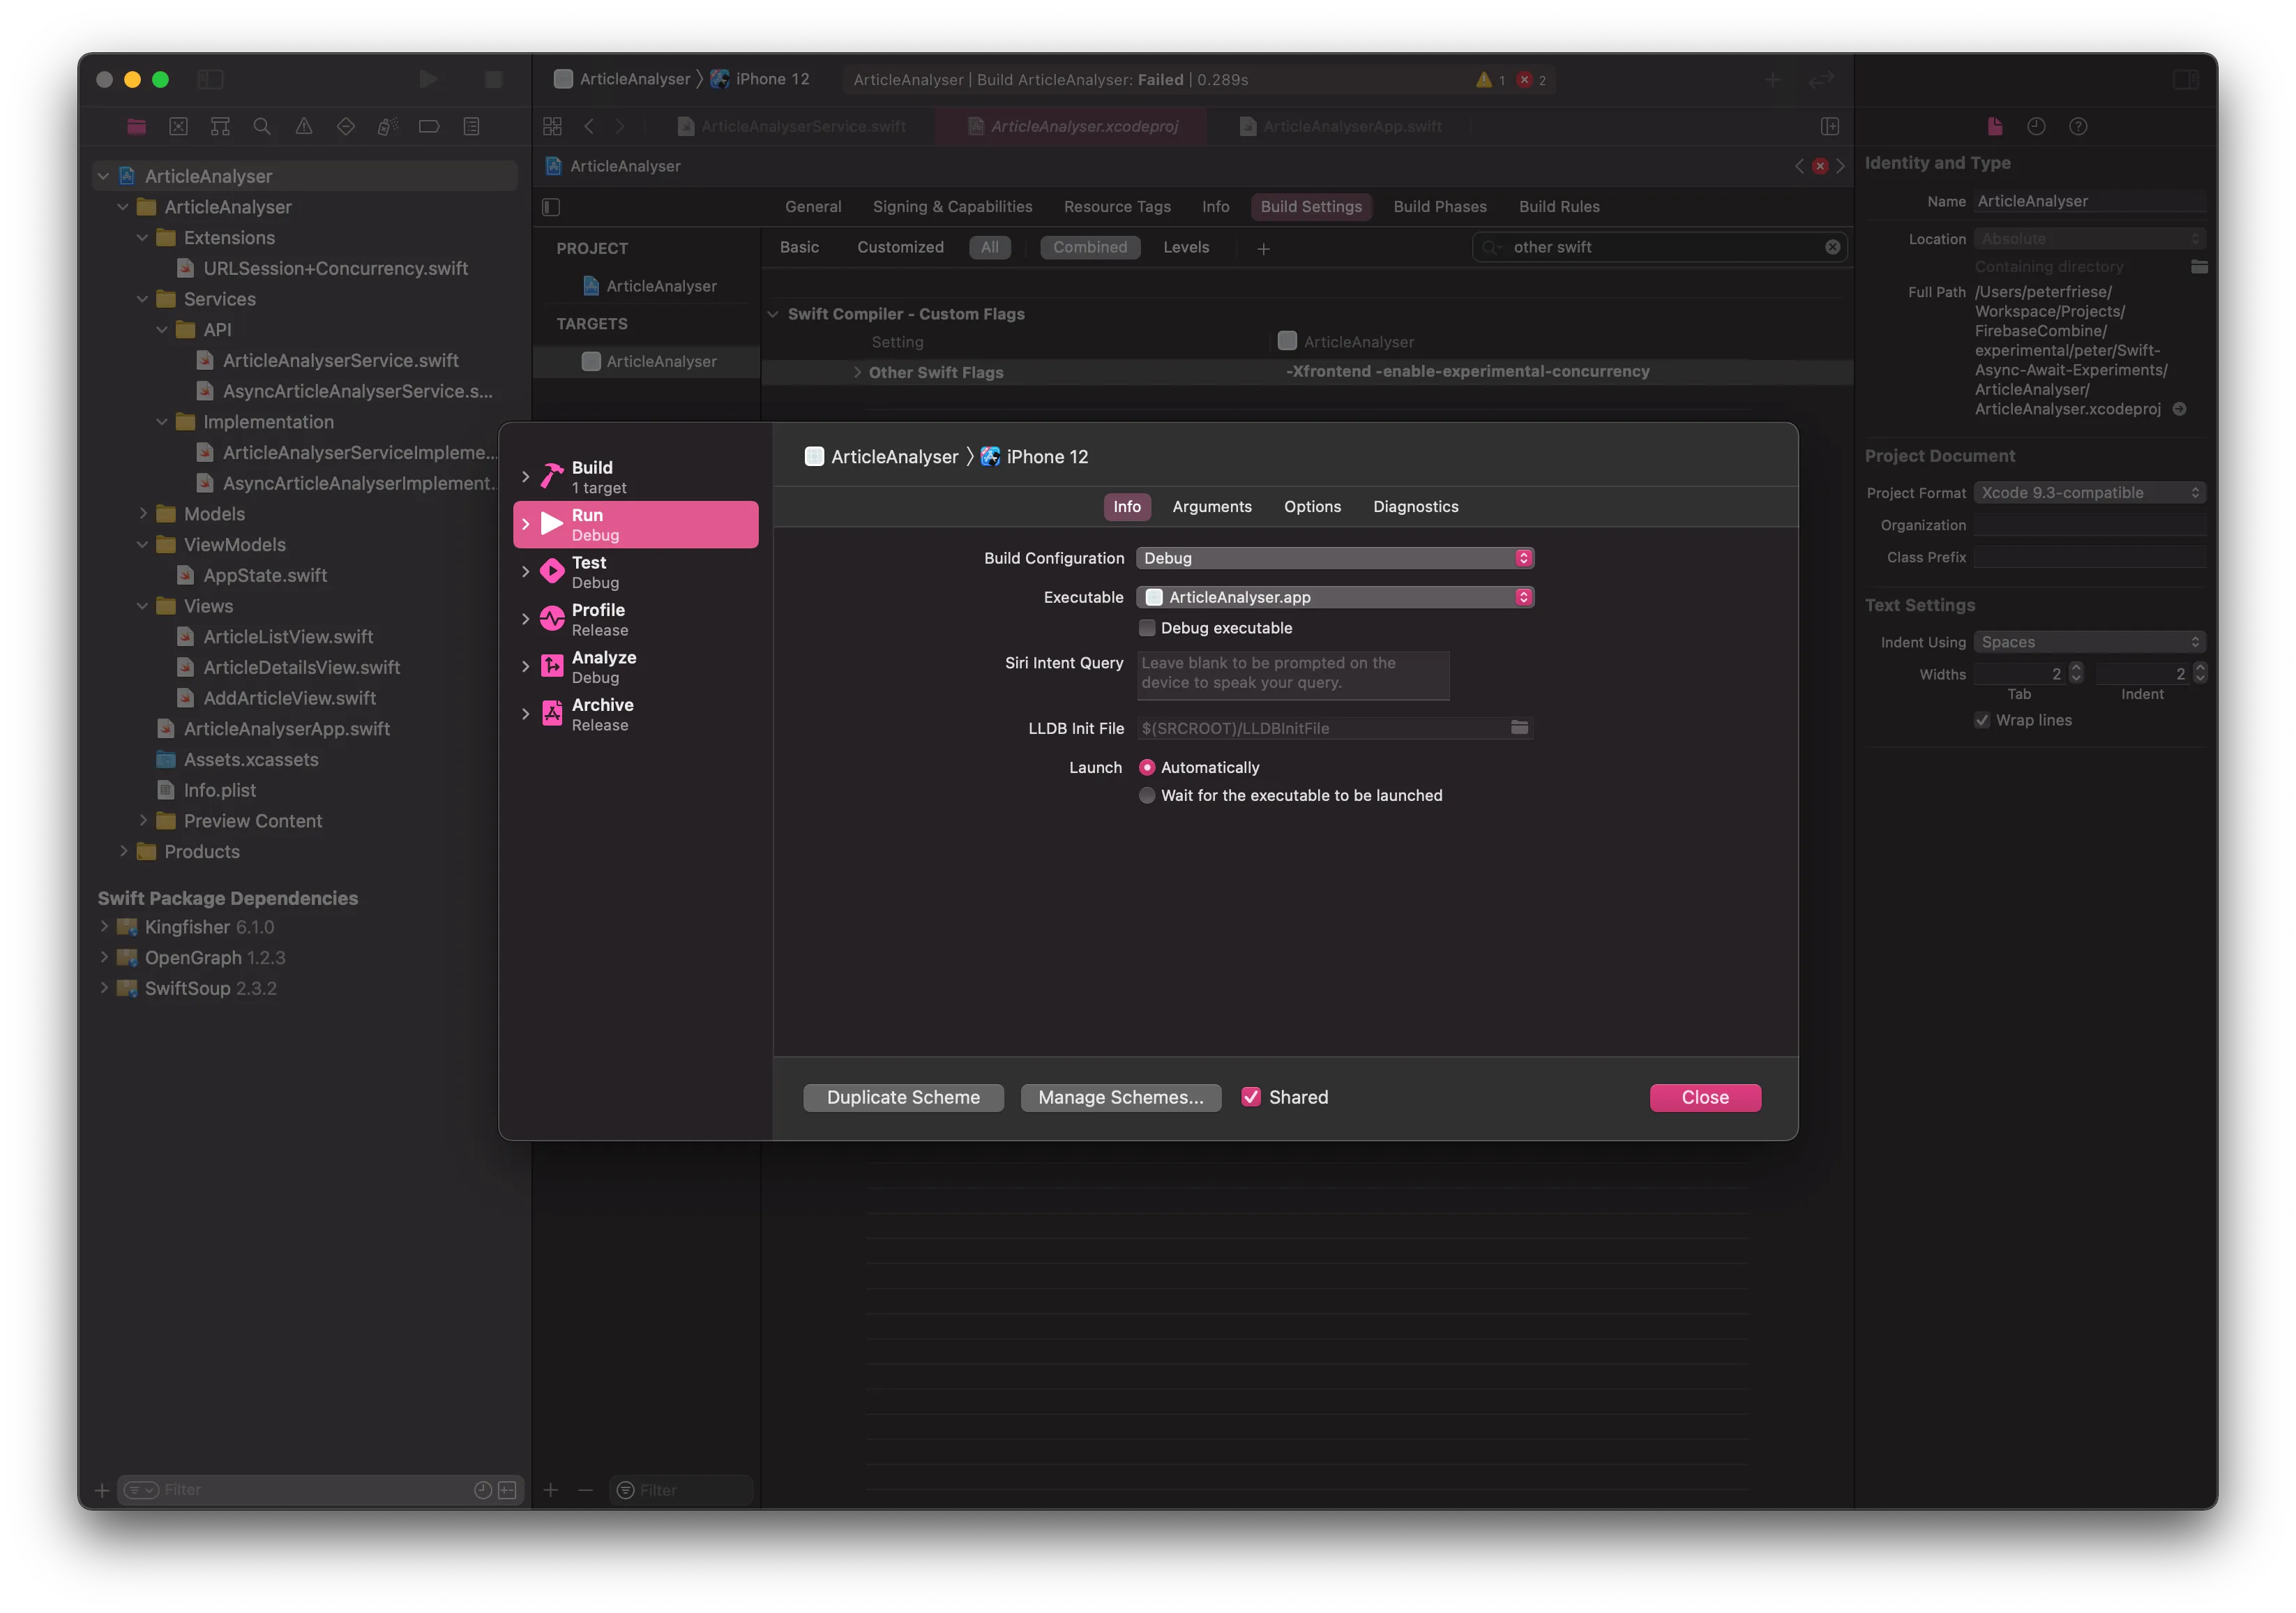
To do this, we need to open the build settings, find Other Swift Flags, and add -Xfrontend -enable-experimental-concurrency
PR 35784 enables async/await by default, so once this rolls out you can use this feature without having to enable experimental support - installing the toolchain will be enough.
You might see an error message saying “Could not launch (application name) - LLDB provided no error string” when trying to launch your app. If this happens, turn off debugging for your application target: Select your target, then choose Edit Scheme… > Run and de-select the Debug executable checkbox
Check out the sample project
If you want to follow along, feel free to download the sample project for this article from this GitHub repo, switch to the starter branch and then open the ArticleAnalyser project.
The sample project contains some functionality I’ve taken from another project I am working on at the moment: Users can add links to articles they want to read later, and the app will analyse the web page and extract information like the title, hero image, and other meta information. In addition, it will use some Natural Language APIs to compute meaningful tags for the text. For example, if you paste a link to this article, it should suggest the tags concurrency and Swift.
Fetching the text of the web page is an asynchronous task, and performing the analyses might take a moment too - especially if we’re going to use any cloud-based APIs. At the moment, the code uses Apple’s NLTagger APIs, but in the future we might decide to use Google’s Cloud Natural Language APIs.
As this is a multi-step process, I’ve defined an interface to help us keep things nice and organised:
protocol ArticleAnalyser {
  // fetch the article and return the entire HTML text
  func fetchArticle(from url: String, completion: @escaping (Result<String, AnalyserError>) -> Void)

  // extract just the body of the web page
  func extractText(from html: String, completion: (Result<String, AnalyserError>) -> Void)

  // extract the title
  func extractTitle(from html: String, completion: (Result<String, AnalyserError>) -> Void)

  // analyse the text and return the tags we inferred
  func inferTags(from text: String, completion: ([Tag]) -> Void)

  // try to extract image meta tag
  func extractImage(from url: String, completion: @escaping (Result<String, AnalyserError>) -> Void)
}
All of the methods in this protocol make use of trailing closures, and some of them are marked as @escaping, meaning there will be code that holds on to the closure after execution has returned from the method. This is a tell-tale sign for asynchronous code.
So far, so good. Now let’s take a look at the code that controls the overall process. Remember, we first need to download the text that makes up the web page, then extract all the information, run our natural language processing, etc.
Are you ready for this? It doesn’t look nice…
extension ArticleAnalyser {
  func process(url: String, completion: @escaping (Article) -> Void) {
    self.fetchArticle(from: url) { result in
      switch result {
      case .failure(let error):
        print(error.localizedDescription)
      case .success(let html):
        self.extractTitle(from: html) { result in
          switch result {
          case .failure(let error):
            print(error.localizedDescription)
          case .success(let title):
            self.extractText(from: html) { result in
              switch result {
              case .failure(let error):
                print(error.localizedDescription)
              case .success(let text):
                self.extractImage(from: url) { result in
                  switch result {
                  case .failure(let error):
                    print(error.localizedDescription)
                  case .success(let imageUrl):
                    self.inferTags(from: text) { tags in
                      let article = Article(url: url, title: title, tags: tags, imageUrlString: imageUrl)
                      completion(article)
                    }
                  }
                }
              }
            }
          }
        }
      }
    }
  }
}
I think we can all agree that this is really hard to read - in fact, when I showed this to a colleague of mine, he said “I didn’t know there were that many closing curly braces in the whole galaxy!”
On top of that, the error handling isn’t even very good.
Async/await
Let’s see how we can improve this code by using async/await.
The first step is to get rid of all the callbacks. Instead, we will tell the compiler that the result of these functions will be delivered asynchronously, and that they might potentially throw errors. And finally, we specify the return type.
protocol AsyncArticleAnalyser {
  // fetch the article and return the entire HTML text
  func fetchArticle(from url: String) async throws -> String

  // extract just the body of the web page
  func extractText(from html: String) async throws -> String

  // extract the title
  func extractTitle(from html: String) async throws -> String

  // analyse the text and return the tags we inferred
  func inferTags(from text: String) async -> [Tag]

  // try to extract image meta tag
  func extractImage(from url: String) async throws -> String
}
This already looks a lot simpler. The contrast is even more striking when we do a before/after comparison of one of the methods:
// before
func fetchArticle(from url: String, completion: @escaping (Result<String, AnalyserError>) -> Void)

// after
func fetchArticle(from url: String) async throws -> String
The new method signature looks much cleaner, and it is easier to see what the input parameters are and what’s the return type.
In the next step, let’s update the code that drives the whole process of downloading and analysing the web site.
extension AsyncArticleAnalyser {
  func process(url: String) async throws -> Article {
    let htmlText = try await fetchArticle(from: url)
    let text = try await extractText(from: htmlText)
    let title = try await extractTitle(from: htmlText)
    let imageUrl = try await extractImage(from: url)
    let tags = await inferTags(from: text)

    return Article(url: url,
                   title: title,
                   tags: tags,
                   imageUrlString: imageUrl)
  }
}
Getting rid of the callback handlers allows us to write this code in a much more concise way. First of all, we can mark the process method as asynchronous. Then, we’ll tell the compiler that the method might throw an error, and that the return type is an Article.
To call a method that is marked as async, we need to prefix the call with the await keyword. This tells the compiler that it needs to wait for the call to return. And the nice thing is - Xcode will tell us if the await keyword is missing and will even offer to fix the code for us.
And just like that, we’ve eliminated the deeply nested callback structure we had to use in the previous, callback-driven implementation. The code has become much cleaner and concise, and it reads like a linear program.
Refactoring the callback-based code
Of course, we need to convert the existing code for fetching the web page and extracting all the metadata as well.
Let’s start by adopting the protocol we defined earlier.
To get an impression of how little effort is required for converting existing call-back based code to async/wait, let’s paste the existing code, and then change it in place.
Here is the code for fetching the web page:
func fetchArticle(from url: String, completion: @escaping (Result<String, AnalyserError>) -> Void) {
  guard let url =  URL(string: url) else {
    completion(.failure(.badURL))
    return
  }

  URLSession.shared.downloadTask(with: url) { (localUrl, urlResponse, error) in
    guard let localUrl = localUrl else {
      completion(.failure(.downloadFailed))
      return
    }
    if let htmlText = try? String(contentsOf: localUrl) {
      completion(.success(htmlText))
    }
  }.resume()
}
The first thing you’ll notice when we paste this into our new method is that we don’t have a completion handler any more that we can use to communicate with our caller. There are various ways to deal with this, and for the initial guard statement, we can just throw an error if the URL is invalid:
func fetchArticle(from url: String) async throws -> String {
  guard let url =  URL(string: url) else {
    throw AnalyserError.badURL
  }

  // ... more code to come

}
To wrap existing code, the async/await proposal provides us with a few helper functions, such as withUnsafeThrowingContinuation. These helper functions take a closure with a continuation parameter, which you can call when your code completes.
Here is how it works:
func fetchArticle(from url: String) async throws -> String {
  guard let url =  URL(string: url) else {
    throw AnalyserError.badURL
  }

  return try await withUnsafeThrowingContinuation { continuation in
    URLSession.shared.downloadTask(with: url) { (localUrl, urlResponse, error) in
      guard let localUrl = localUrl else {
        continuation.resume(throwing: AnalyserError.badURL)
        return
      }
      if let htmlText = try? String(contentsOf: localUrl) {
        continuation.resume(returning: htmlText)
      }
    }
    .resume()
  }
}- First, we wrap our existing code in a call to
withUnsafeThrowingContinuation. - Then, whenever you want to communicate back to the caller, you call the
continuationinstead. UnsafeThrowingContinuationhas several overloadedresumemethods that allow you to return aResulttype, a normal return value, or to even throw an error.
This allows us to throw an error in case the download failed. And if the download succeeded, we can return the text of the web page.
And these are the only changes you need to make to turn your code from using callbacks to using async/await.
You now have all the techniques to convert the remaining functions. I’ll leave this as an exercise for you, but if you’re stuck, check out the final branch in the project’s repo.
Connecting the UI
Finally, let’s connect the UI to our new code. In this sample app, we use ArticlesViewModel as our source of truth - it has a published property named articles that contains a list of all the articles that the main list view will display.
Currently, when the user adds a new URL to be analysed, the UI will call addNewArticle, providing the url as an input parameter. This method will then call performAddNewArticle, which uses the callback-based AnalyserService to download and analyse the article and add it to the articles array.
Instead, we want to use our new AsyncArticleAnalyserService . We can start by making a copy of performAddNewArticle, and make some adjustments so it works with our new asynchronous code.
func performAddNewArticleAsync(from url: String) {
  DispatchQueue.main.async {
    self.isFetching = true
  }

  do {
    let article = try await asyncAnalyserService.process(url: url)
    DispatchQueue.main.async {
      self.articles.append(article)
    }
  }
  catch {
    print(error.localizedDescription)
  }

  DispatchQueue.main.async {
    self.isFetching = false
  }
}
We already know that we need to prefix calls to asynchronous functions with async, and since the method can throw, we also need to wrap the call in a do / try / catch block. We can also get rid of the trailing closure and assign the result to a local variable, named article.
But Xcode doesn’t seem to be happy and shows an error: 'async' in a function that does not support concurrency. This is because we’re trying to call from a place that isn’t contained in an asynchronous context. Instead of establishing an asynchronous context ourselves, we can follow Xcode’s suggestion and mark performAddNewArticleAsync using @asyncHandler:
@asyncHandler func performAddNewArticleAsync(from url: String) {
  DispatchQueue.main.async {
    self.isFetching = true
  }

  do {
    let article = try await asyncAnalyserService.process(url: url)
    DispatchQueue.main.async {
      self.articles.append(article)
    }
  }
  catch {
    print(error.localizedDescription)
  }

  DispatchQueue.main.async {
    self.isFetching = false
  }
}
And with that, we can now run the app again and see our shiny new async/await implementation in action!
Closure ;-)
I think async/await is a wonderful addition to the Swift language. Many other languages, such as C#, JavaScript, or TypeScript have similar language features, and adding async/await to Swift will make it easier for people coming from these languages.
Using async/await will make your code more readable, and refactoring existing code is relatively straightforward, as we’ve just seen.
One of the strongest arguments for using async/await in your own code is that this allows you to explicitly express that certain parts of your code run asynchronously. This is a strong signal for your users and helps them better understand which parts of your API are asynchronous and might only return after a short pause. Even better - the Swift compiler will now issue warnings and errors if developers are trying to call your API in a non-asynchronous way. This is something that just wasn’t possible with callbacks and trailing closures.
I also think this is great news for anyone who builds APIs, and will hopefully reduce the amount of time they spend on support. Fun fact: “The Firebase APIs are asynchronous…” is one my most frequently used sentences when answering questions on StackOverflow.
I can’t wait for this feature to ship in one of the next versions of Swift. What about you? Reach out to me on Twitter or on the discussions forum of the repository for this article.

Reverse-Engineering Xcode's Coding Intelligence prompt
A look under the hood
Extracting structured data from PDFs using Gemini 2.0 and Genkit

Understanding SwiftUI Preferences
SwiftUI Parent / Child View Communication
Creating a reusable action menu component in SwiftUI

Creating custom SF Symbols using the SF Symbols app
No Design Skills Needed