
Essential Xcode Shortcuts for More Efficient Coding
Accelerate Your Coding Workflow
As developers, we spend a considerable amount of time in our IDE, so it’s worth becoming an expert in using it. Simply being able to edit code doesn’t cut it - you need to become proficient.
In The Pragmatic Programmer, the authors recommend choosing one editor, and using it for all editing tasks. The reasoning behind their recommendation is simple: once you’ve memorised all keyboard shortcuts, your productivity will soar.
While you could certainly use just one editor like VS Code for all your source code editing tasks, as iOS / macOS / watchOS / tvOS developers, we’re somewhat bound to use Xcode, as it includes so much more tools than just the source code editor.
Nevertheless, it pays off to know your way around Xcode and be proficient in the core editing and navigation commands to increase your productivity.
I’ve collected a list of my favourite keybindings and mouse commands - hope you’ll find them useful as well! All keybindings listed here use Xcode’s default keybinding - with one notable exception.
- ⌘ = Command
- ⌥ = Option/Alt
- ⇧ = Shift
- ⌃ = Control
- ←→ ↑↓ = Arrow keys
- ↩ = Enter
Editing
Let’s begin with editing - this is one of the most basic activities, so every little improvement will boost your productivity!
Code Completion (⌃ + Space)
It’s hard to imagine working without code completion - I use it all of the time to explore APIs, and to save time when typing.
Moving Lines (⌥ + ⌘ + [ and ⌥ + ⌘ + ])
Moving single lines or entire blocks around in your code is immensely useful, for example when organising code that belongs together. Xcode automatically takes care of indentation \o/
Delete Entire Line (⌘ + D)
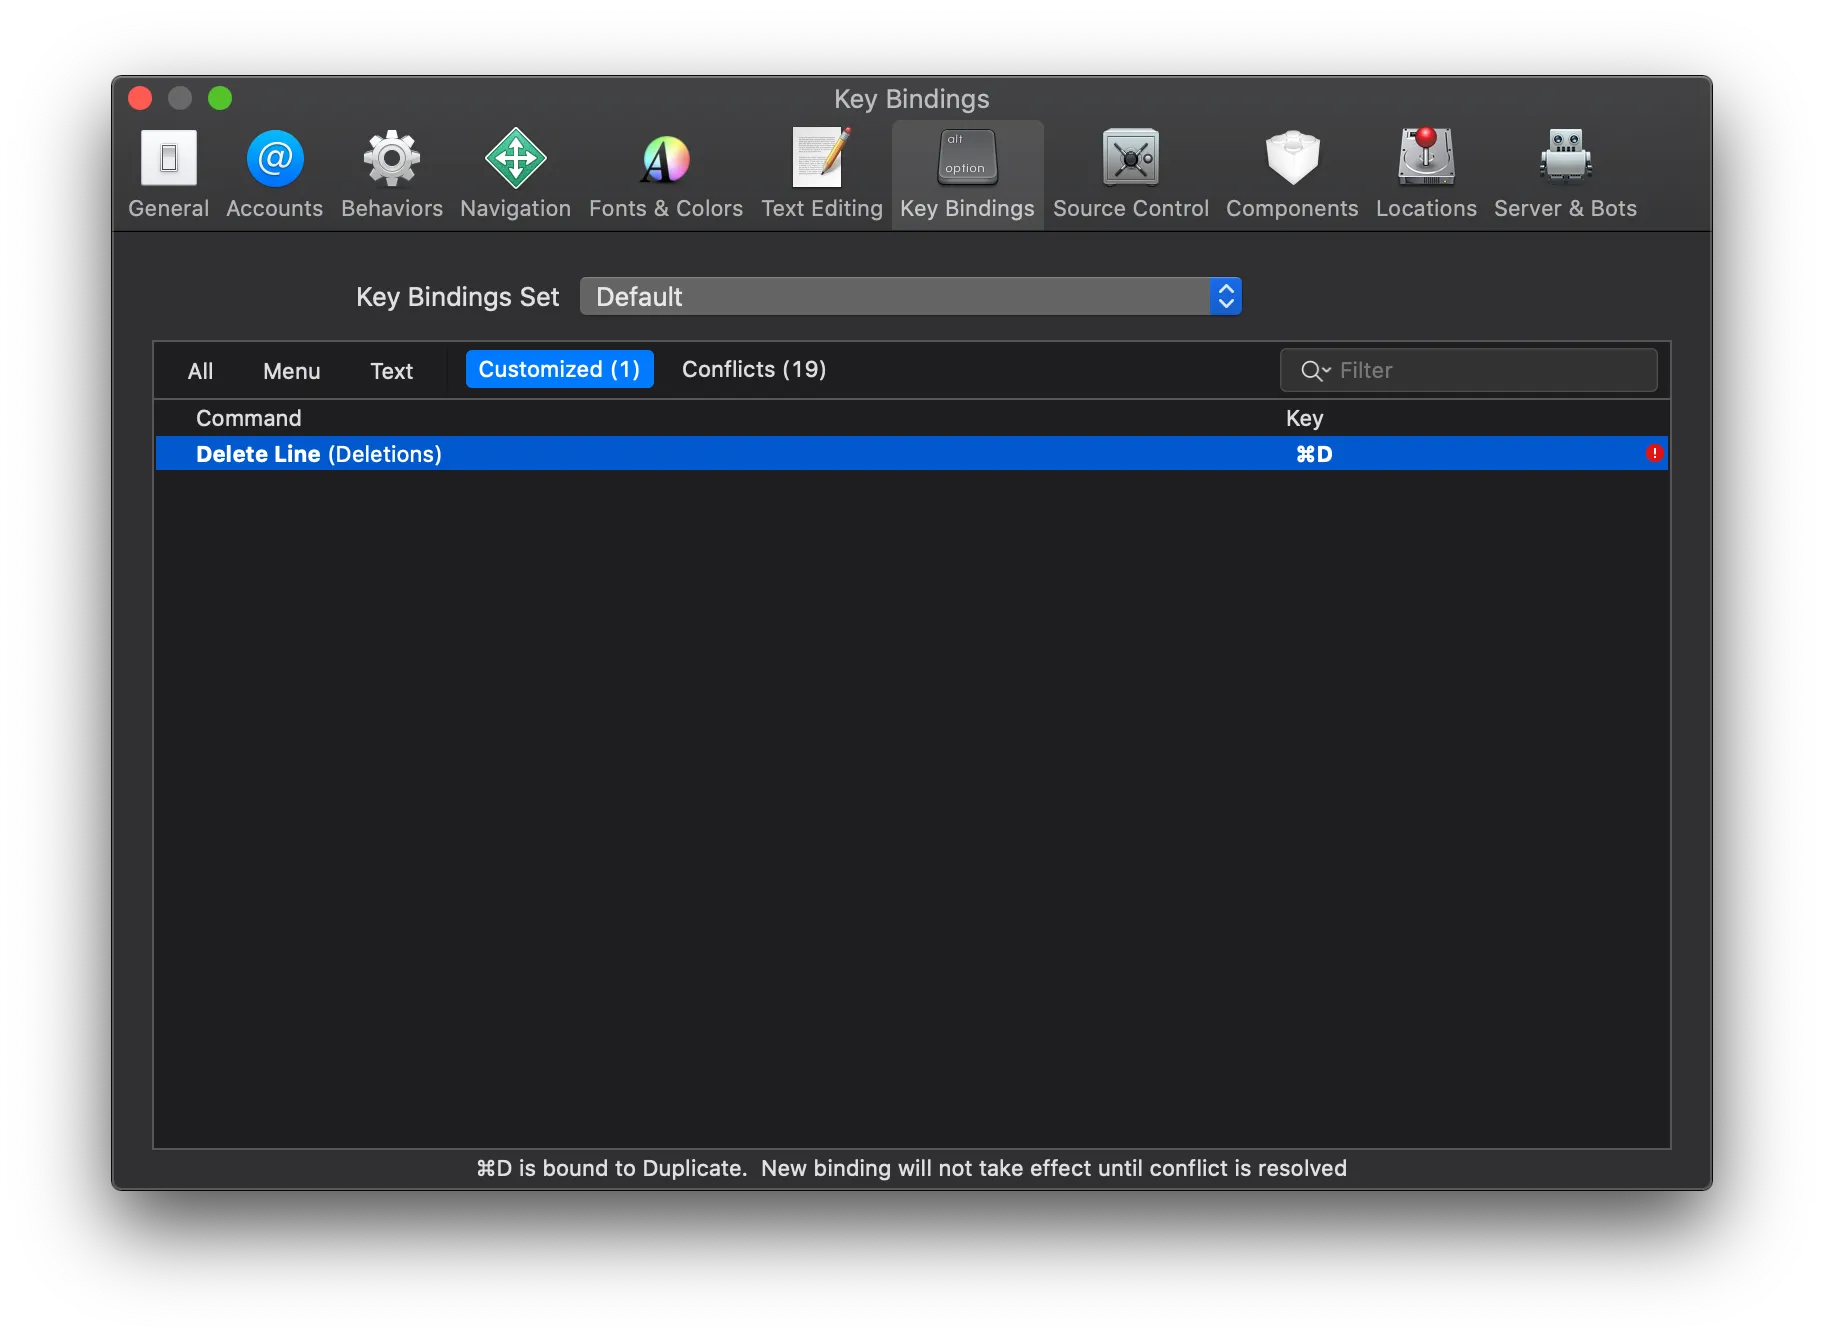
I often need to delete an entire line - Xcode offers an editor command for this, but unfortunately it is not bound to a key combo in the default key bindings. After some consideration I decided to make an exception and include a custom key combo in this list, just because I think it is so useful. To define custom keybindings, go to Xcode settings (press ⌘ + ,), navigate to the Key Bindings tab, and use the filter field to search for “Delete Line”. Double click into the Key field, then press your preferred key combo. I use ⌘ + D (for Delete Line).
Comment Current Line / Block (⌘ + /)
Useful for temporarily deactivating a bunch of lines in your code. But please remember to not check this in. Your version control system is a better tool for going back in history than a chunk of commented lines that nobody know what they’re here for!
Balance Indentation (⌃ + I)
Just like many of the other commands above, this works both on single lines and on entire blocks of code. Useful after pasting code from elsewhere (did somebody say Stack Overflow?).
Navigation
Estimates say that you read a lot more code than you will write, and I wholeheartedly agree. You read code all of the time: when digging into a new codebase, when debugging, and even when writing new code! Here are a couple of commands that will help you stay on top of your navigation.
Going Back and Forth (⌃ + ⌘ + ← and ⌃ + ⌘ + →)
Xcode tracks your entire movement history as soon as you open or create a project. Any file you go to, any symbol you look up - it all is appended to the IDE’s navigation stack. Use ⌃ + ⌘ + ← and ⌃ + ⌘ + → to go back and forth between the source code locations you visited.
Jump to Definition (⌃ + ⌘ + J or ⌃ + ⌘ + Click)
This comes in really handy when learning new APIs or navigating an unknown codebase. Not sure what ObservedObject does? Navigate to its definition to see which methods and properties it has, which interfaces it implements and which class it inherits from. For most of Apple’s APIs, you’ll also see the documentation (of course, you can always invoke Quick Help using ⌥ + click)
Find Selected Symbol in Workspace (⇧ + ⌃ + ⌘ + F)
This is essentially the opposite of Jump to definition, and it’s particularly helpful trying to understand how an API is used in the codebase. It also gives you an feeling for how much grief you’re going to cause your teammates (or other API consumers) when refactoring an API…!
Find Call Hierarchy (⇧ + ⌃ + ⌘ + H)
Similar to Find selected symbol in workspace, but with a focus on methods, this shortcut will open the Call Hierarchy view to show any places in your code that call the specified method, as well as any methods that call those methods in turn, and so on.
Open Quickly (⇧ + ⌘ + O)
If you take away only one thing from reading this article, are it this one. Open quickly allows you to quickly jump into any source location in your project / workspace. Just start typing the name of any class, interface, function, method, enum, … in your project (and any SDK you imported) and it will populate the popup with a list of symbols that match the search term. It performs some fuzzy searching, so you can type partial search terms like UIAD to search for UIApplicationDelegate.
Jump to Line (⌘ + L)
Useful for when, you know, you need to navigate to a specific line in the current file.
Document outline (⌃ + 6 or ⌘ + hovering the minimap)
These actually are two different pieces of UI, but they basically do the same:
Use ⌃ + 6 to drop down a menu from the Jump Bar (the area directly above the code editor) with all the symbols in the current source file. You can then navigate using the arrow keys, or by typing to filter the list of symbols. Useful not just for large files.
The minimap was a welcome addition to the Xcode editor in one of the recent releases of Xcode, and provides a high-level visual overview of your code (Apple, if you’re reading this: can we please get a way to zoom the minimap, e.g. by dragging the divider?). When hovering over the minimap, it will display a flout with the name of the symbol the mouse cursor is hovering over. Press ⌘ while hovering to see a list of all symbols.
View Management
Let switch gears and take a look at view management. The editor takes up most of the screen real estate in Xcode, and it is surrounded by a number of views that display contextual information.
Toggle Canvas / SwiftUI Preview (⌥ + ⌘ + ↩)
When writing SwiftUI code, Canvas provides a live preview of the UI you’re building. Apples has gone to great lengths to make this a two-way experience, i.e. any changes you make in the preview (e.g. by moving UI elements, or adding new ones) will be reflected in the code editor as well, and vice versa. This allows for rapid prototyping with fast turn-around times. You no longer need to launch your application to check if the button looks better in red or in blue.
However, we don’t always need to see the preview, so it’s good to be able to toggle it as required. Use ⌥ + ⌘ + ↩ to hide or show the Canvas.
Toggle Views
Xcode has three main areas surrounding the code editor, which can be toggled to make more space for editing (or showing context information, just as required):
- Left: Navigator (
⌘ + 0) - Right: Inspectors (
⌘ + ⌥ + 0) - Bottom: Debug (
⇧ + ⌘ + Y)
Summary
And that was a quick tour of my favourite productivity shortcuts in Xcode 11. Here is a table to give you a quick overview of the commands and key bindings:
| Area | Command | Shortcut |
|---|---|---|
| Editor | Code completion | ⌃ + Space |
| Editor | Move line up | ⌥ + ⌘ + [ |
| Editor | Move line down | ⌥ + ⌘ + ] |
| Editor | Delete entire line (*) | ⌘ + D |
| Editor | Comment line / selection | ⌘ + / |
| Editor | Balance indent | ⌃ + I |
| Navigation | Go back | ⌃ + ⌘ + ← |
| Navigation | Go forward | ⌃ + ⌘ + → |
| Navigation | Jump to definition | ⌃ + ⌘ + J |
| Navigation | Find selected symbol in workspace | ⇧ + ⌃ + ⌘ + F |
| Navigation | Find call hierarchy | ⇧ + ⌃ + ⌘ + H |
| Navigation | Open quickly | ⇧ + ⌘ + O |
| Navigation | Jump to line | ⌘ + L |
| Navigation | Show document items | ⌃ + 6 |
| Views | Toggle canvas | ⌥ + ⌘ + ↩ |
| Views | Toggle Navigator | ⌘ + 0 |
| Views | Toggle Inspectors | ⌘ + ⌥ + 0 |
| Views | Toogle Debug area | ⇧ + ⌘ + Y |
| Settings | Open settings dialog | ⌘ + , |

Agentic Coding in Xcode with Gemini CLI
Build apps with AI assistance in Xcode using Gemini CLI

Turn Your Photos Into Miniature Magic with Nano Banana
Build stunning image generation apps in iOS with just a few lines of Swift

Reverse-Engineering Xcode's Coding Intelligence prompt
A look under the hood

Extracting structured data from PDFs using Gemini 2.0 and Genkit

Understanding SwiftUI Preferences
SwiftUI Parent / Child View Communication