
The Ultimate Guide to the SwiftUI 2 Application Life Cycle
SwiftUI 2
For the longest time, iOS developers have used AppDelegates as the main entry point for their applications. With the launch of SwiftUI2 at WWDC 2020, Apple has introduced a new application life cycle that (almost) completely does away with AppDelegate, making way for a DSL-like approach.
In this article, I will discuss why this change was introduced, and how you can make use of the new life cycle in new or existing apps.
Specifying the application entry point
One of the first questions that we need to answer is, how can we tell the compiler about the entry point to our application? SE-0281 specifies how Type-Based Program Entry Points work:
The Swift compiler will recognize a type annotated with the @main attribute as providing the entry point for a program. Types marked with @main have a single implicit requirement: declaring a static main() method.
When creating a new SwiftUI app, the app’s main class looks like this:
import SwiftUI

@main
struct SwiftUIAppLifeCycleApp: App {
  var body: some Scene {
    WindowGroup {
      ContentView()
    }
  }
}
So where is the static main() function that’s mentioned in SE-0281?
Well, it turns out that framework providers can (and should) provide a default implementation for their users’ convenience. Looking at the code snippet above, you will notice that SwiftUIAppLifeCycleApp conforms to the App protocol. Apple provides a protocol extension that looks like this:
@available(iOS 14.0, macOS 11.0, tvOS 14.0, watchOS 7.0, *)
extension App {

    /// Initializes and runs the app.
    ///
    /// If you precede your ``SwiftUI/App`` conformer's declaration with the
    /// [@main](https://docs.swift.org/swift-book/ReferenceManual/Attributes.html#ID626)
    /// attribute, the system calls the conformer's `main()` method to launch
    /// the app. SwiftUI provides a
    /// default implementation of the method that manages the launch process in
    /// a platform-appropriate way.
    public static func main()
}
And there we have it - this protocol extension provides a default implementation that takes care of the application startup.
Since the SwiftUI framework isn’t open source, we can’t see how Apple implemented this, but Swift Argument Parser is open source, and uses this approach as well. Check out the source code for ParsableCommand to see how they use a protocol extension to provide a default implementation of the static main function that serves as the program entry point:
extension ParsableCommand {
...
public static func main(_ arguments: [String]?) {
do {
var command = try parseAsRoot(arguments)
try command.run()
} catch {
exit(withError: error)
}
}
public static func main() {
self.main(nil)
}
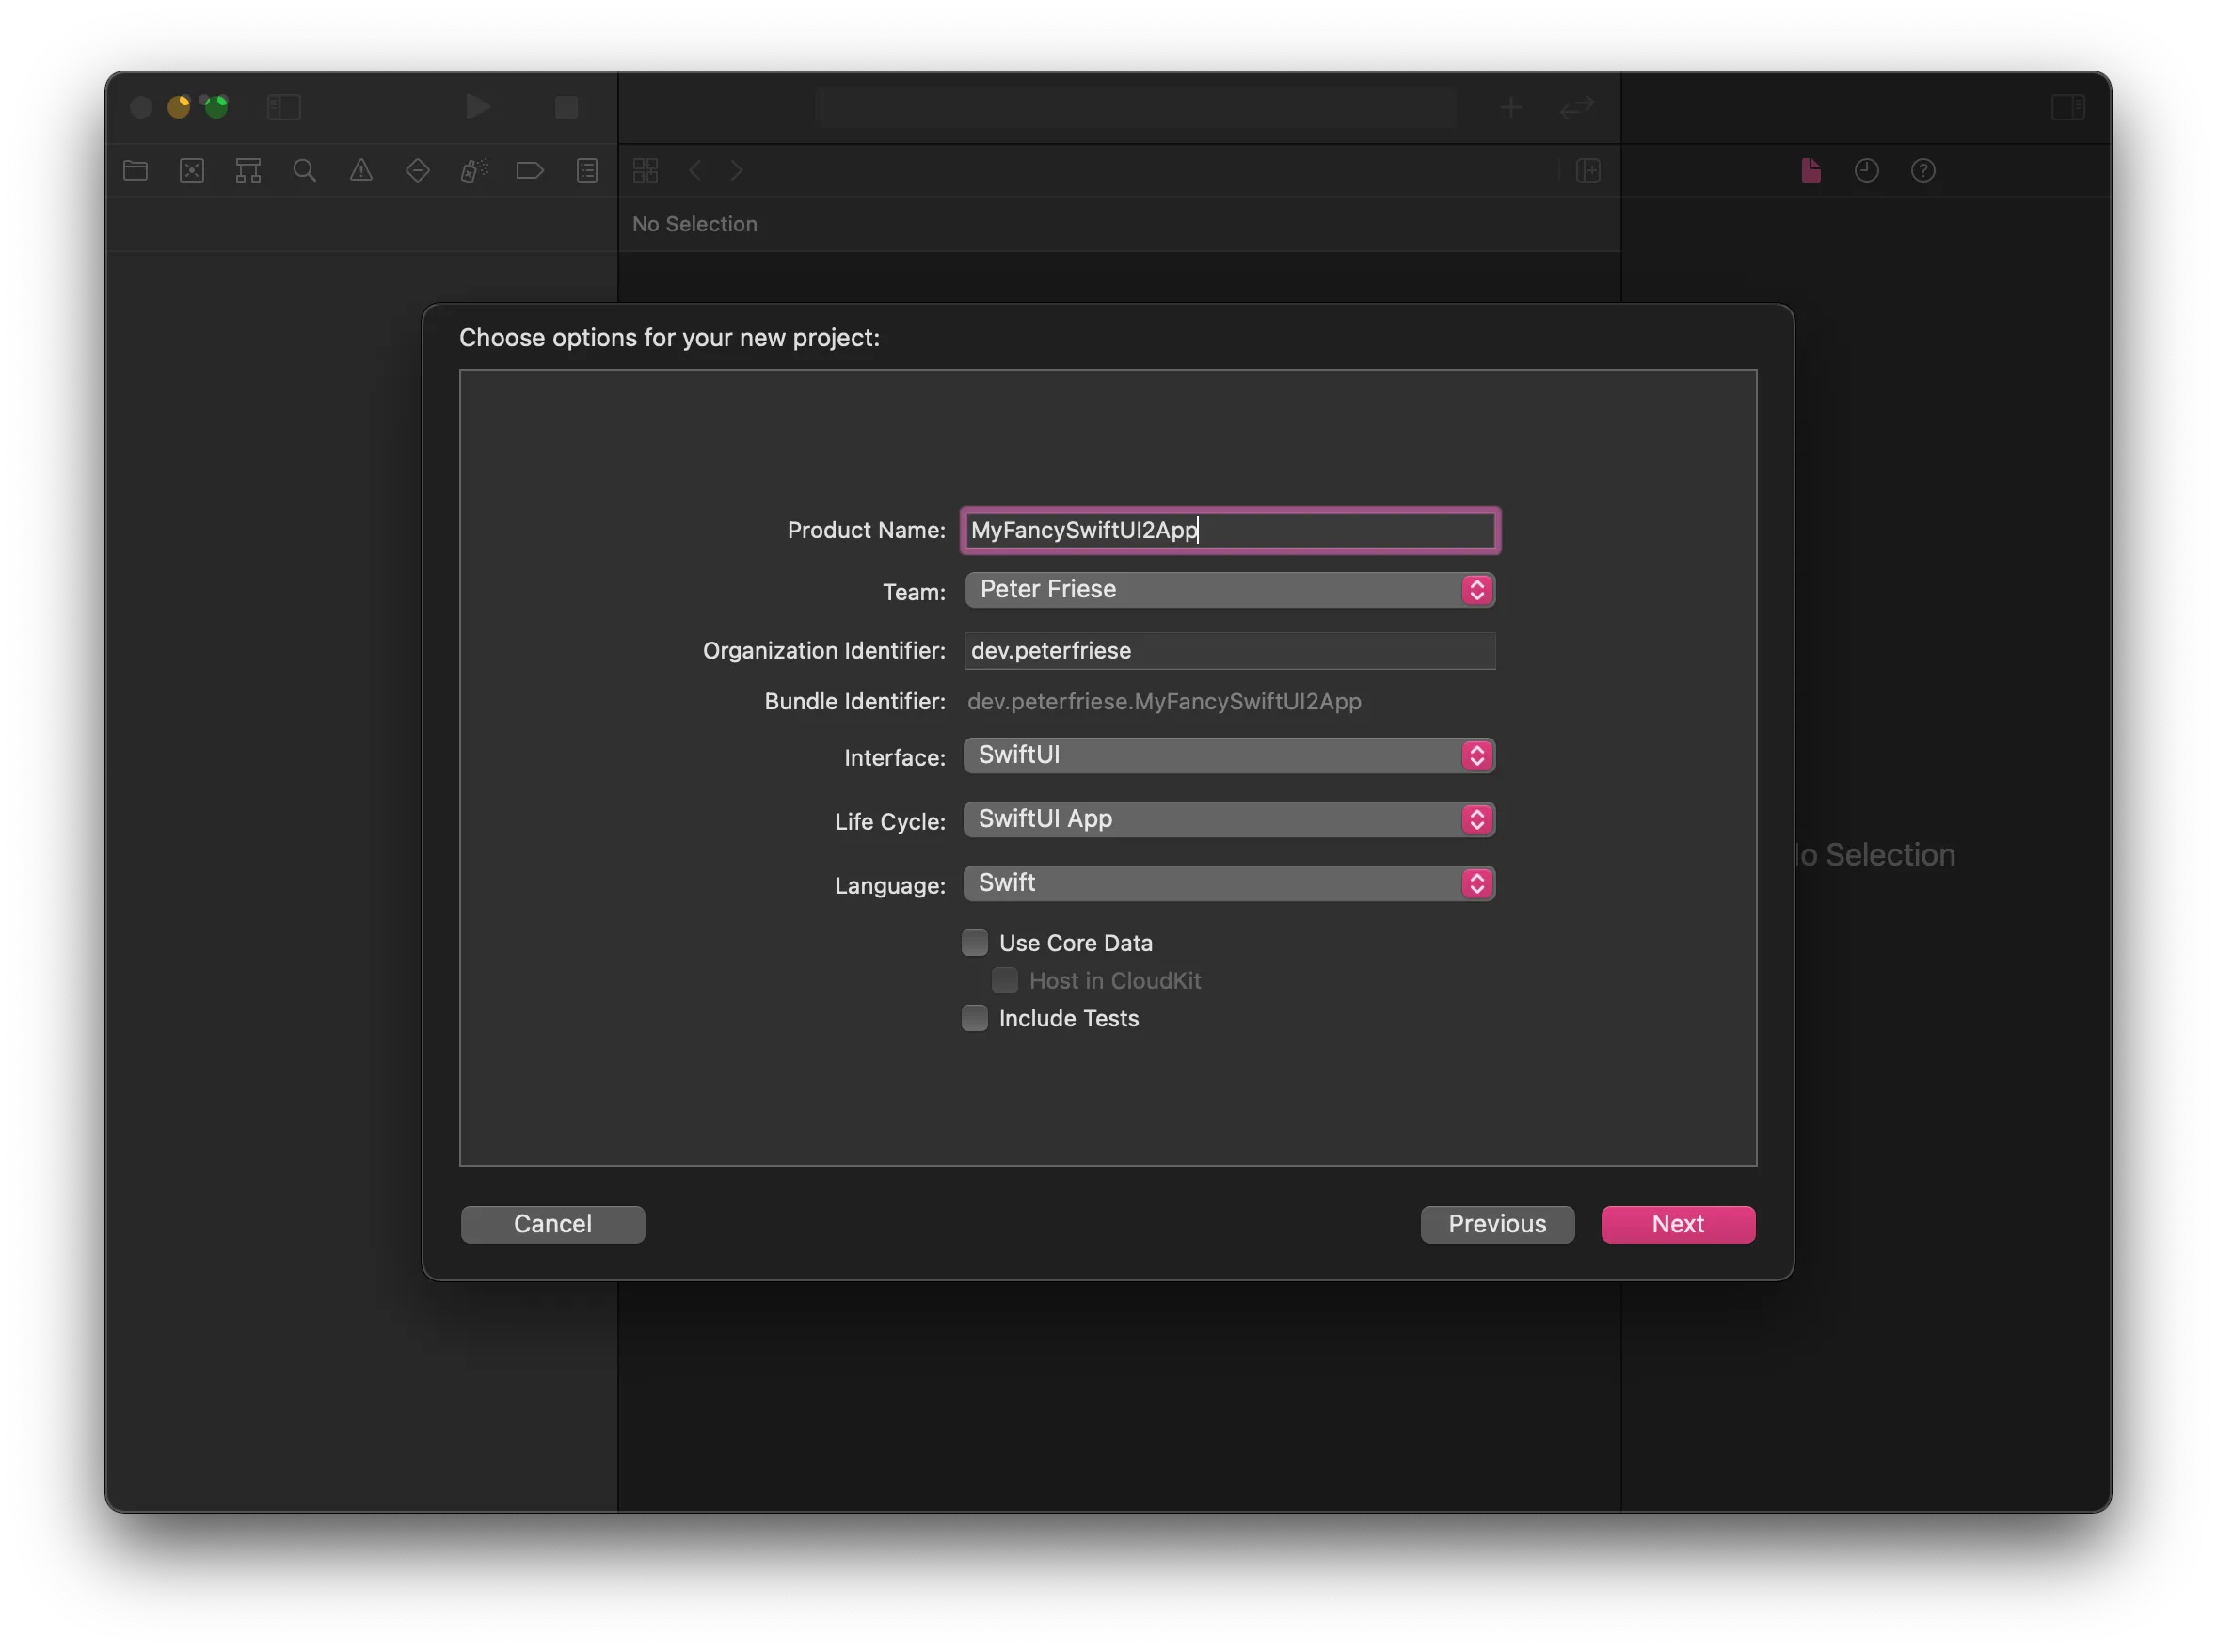
}If all this sounds a bit complicated, the good news is you don’t actually have to worry about it when creating a new SwiftUI application: just make sure to select SwiftUI App in the Life Cycle dropdown when creating your app, and you’re done:
Let’s take a look at some common scenarios.
Initialising resources / your favourite SDK or framework
Most applications need to perform a few steps at application startup: fetching some configuration values, connecting to a database, or initialising a framework or third-party SDK.
Usually, you’d do this in your ApplicationDelegates application(_:didFinishLaunchingWithOptions:) method. As we no longer have an application delegate, we need to find other ways to initialise our application. Depending on your specific requirements, here are some strategies:
- Implement an initialiser on your main class (see the docs)
- Set initial values for stored properties (see the docs)
- Set default property values using a closure (see the docs)
@main
struct ColorsApp: App {
  init() {
    print("Colors application is starting up. App initialiser.")
  }

  var body: some Scene {
    WindowGroup {
      ContentView()
    }
}
If none of this meets your needs, you might need an AppDelegate after all. Read on until the end to learn how you can add one.
Handling your application’s life cycle
It’s sometimes useful to be able to know which state your application is in. For example, you might want to fetch new data as soon as your app becomes active, or flush any caches once your application becomes inactive and transitions into the background.
Usually, you would implement applicationDidBecomeActive, applicationWillResignActive, or applicationDidEnterBackground on your ApplicationDelegate.
Starting with iOS 14.0, Apple has provided a new API that allows for a more elegant and maintainable way of tracking an app’s state: ScenePhase. Your project can have multiple scenes, but chances are you’ve got only one scene, represented by WindowGroup.
SwiftUI tracks a scene’s state in the environment, and you can make the current value accessible to your code by fetching it using the @Environment property wrapper, and then using the onChange(of:) modifier to listen to any changes:
@main
struct SwiftUIAppLifeCycleApp: App {
  @Environment(\.scenePhase) var scenePhase

  var body: some Scene {
    WindowGroup {
      ContentView()
    }
    .onChange(of: scenePhase) { newScenePhase in
      switch newScenePhase {
      case .active:
        print("App is active")
      case .inactive:
        print("App is inactive")
      case .background:
        print("App is in background")
      @unknown default:
        print("Oh - interesting: I received an unexpected new value.")
      }
    }
  }
}
It is worth noting that you can read the phase from other locations in your app as well. When reading the phase at the top level of the app (like shown in the code snippet), you will get an aggregate of all the phases in your app. A value of .inactive means that none of the scenes in your app is active. When reading the phase on a view, you will receive the value of the phase that contains the view. Keep in mind your app might contain other scenes that have other phase values at this time. For more details about scene phases, read Apple’s documentation.
Handling deep links
Previously, when handling deep links, you’d have to implement application(_:open:options:), and route the incoming URL to the most appropriate handler.
This becomes a lot easier with the new app life cycle model. You can handle incoming URLs by attaching the onOpenURL modifier to the top-most scene in your app:
@main
struct SwiftUIAppLifeCycleApp: App {
  var body: some Scene {
    WindowGroup {
      ContentView()
        .onOpenURL { url in
          print("Received URL: \(url)")
        }
    }
  }
}
What’s really cool: you can install multiple URL handlers throughout your application - making deep linking a lot easier, as you can handle incoming links where it’s most appropriate.
If at all possible, you should use universal links (or Firebase Dynamic Links, which makes use of universal links for iOS apps), as these use associated domains to create a connection between a website you own and your app - this will allow you to share data securely.
However, you can still use custom URL schemes to link to content within your app.
Either way, a simple way to trigger a deep link in your app is to use the following command on you development machine:
xcrun simctl openurl booted <your url>Continuing user activities
If your app uses NSUserActivity to integrate with Siri, Handoff, or Spotlight, you need to handle user activity continuation.
Again, the new application life cycle model makes this easier by providing two modifiers that allow you to advertise an activity and later continue it.
Here is a snippet that shows how to advertise an activity, for example, in a details view:
struct ColorDetailsView: View {
  var color: String

  var body: some View {
    Image(color)
      // ...
      .userActivity("showColor" ) { activity in
        activity.title = color
        activity.isEligibleForSearch = true
        activity.isEligibleForPrediction = true
        // ...
      }
  }
}
To allow continuation of this activity, you can register a onContinueUserActivity closure in your top-level navigation view, like this:
import SwiftUI

struct ContentView: View {
  var colors = ["Red", "Green", "Yellow", "Blue", "Pink", "Purple"]

  @State var selectedColor: String? = nil

  var body: some View {
    NavigationView {
      ScrollView {
        LazyVGrid(columns: columns) {
          ForEach(colors, id: \.self) { color in
            NavigationLink(destination: ColorDetailsView(color: color),
                           tag: color,
                           selection: $selectedColor) {
              Image(color)
            }
          }
        }
        .onContinueUserActivity("showColor") { userActivity in
          if let color = userActivity.userInfo?["colorName"] as? String {
            selectedColor = color
          }
        }
      }
    }
  }
}
Help - none of the above works for me!
Not all of AppDelegate’s callbacks are supported by the new application life cycle (yet). If none of the above meets your needs, you might require an AppDelegate after all.
Another reason you might require an AppDelegate is if you use any third-party SDKs that make use of method swizzling to inject themselves into the application life cycle. Firebase is a well-known case.
To help you out, Swift provides a way to connect a conformer of AppDelegate with your App implementation: @UIApplicationDelegateAdaptor. Here is how to use it:
class AppDelegate: NSObject, UIApplicationDelegate {
  func application(_ application: UIApplication,
                   didFinishLaunchingWithOptions launchOptions: [UIApplication.LaunchOptionsKey : Any]? = nil) -> Bool {
    print("Colors application is starting up. ApplicationDelegate didFinishLaunchingWithOptions.")
    return true
  }
}

@main
struct ColorsApp: App {
  @UIApplicationDelegateAdaptor(AppDelegate.self) var delegate

  var body: some Scene {
    WindowGroup {
      ContentView()
    }
  }
}
Don’t forget to remove the @main attribute if you copy an existing AppDelegate implementation - otherwise, the compiler will complain about multiple application entry points.
Conclusion
With all this, let’s discuss why Apple made this change. I think there are a couple of reasons:
SE-0281 explicitly states that one of the design goals was “to offer a more general purpose and lightweight mechanism for delegating a program’s entry point to a designated type.”
The DSL-based approach Apple chose for handling the application life cycle aligns nicely with the declarative approach for building UIs in SwiftUI. Using the same concepts makes things easier to understand and will help onboarding new developers.
The key benefit of any declarative approach is: instead of putting the burden of implementing a specific functionality on developers, the framework / platform provider takes care of this. Should any changes become necessary, it will be a lot easier to ship these without breaking many developers’ apps - ideally, developers won’t have to change their implementation, as the framework will take care of everything for you.
Overall, the new application life cycle model makes implementing your application start-up easier and less convoluted. Your code will be cleaner and easier to maintain - and that’s always a good thing, if you ask me.
I hope this article helped you understand the ins and outs of the new application life cycle. If you’ve got any questions or remarks regarding this article, feel free to follow me on Twitter and send me a message, or file an issue on the sample project on GitHub.
Thanks for reading!
Further reading
If you want to learn more, check out these resources:
- Swift Evolution SE-0281 - @main: Type-Based Program Entry Points
- The App Protocol
- Allowing Apps and Websites to Link to Your Content
The header image is based on Rocket by Icongeek26 on the Noun Project.
Agentic Coding in Xcode with Gemini CLI
Build apps with AI assistance in Xcode using Gemini CLI

Turn Your Photos Into Miniature Magic with Nano Banana
Build stunning image generation apps in iOS with just a few lines of Swift

Reverse-Engineering Xcode's Coding Intelligence prompt
A look under the hood
Extracting structured data from PDFs using Gemini 2.0 and Genkit
Understanding SwiftUI Preferences
SwiftUI Parent / Child View Communication