SwiftUI, Combine, and Firebase
Replicating the iOS Reminders App, Part 1
At WWDC 2019, Apple announced their declarative UI framework, SwiftUI. By now, most of you probably have had time to take SwiftUI for a spin and get an understanding of how it works in general. In this series, I’d like to change gears and see how far we can get in writing a real-world iOS application using SwiftUI and a few other technologies.
To make it easier to see where SwiftUI excels (and where it falls short), let’s replicate an application everybody knows: the iOS Reminders app. Now, if you’re anything like me, you probably haven’t been using the Reminders app much and instead use one of the popular to-do list apps available in the App Store. I was pleasantly surprised to discover that the iOS Reminders app has caught up with the competition and has become a much more feature-complete and powerful productivity app. For the sake of simplicity, we’re going to focus on the core functionality, and will gradually add more features in future articles.
As there’s still a lot of ground to cover, I’ve decided to break this project apart into a series of articles that build upon each other. Here is a quick overview of what we’re going to build:
- In part 1 of the series (which you are reading right now), we will focus on building the UI with SwiftUI, using a simple data model.
- In part 2, we’re going to connect the application to Firebase, and will synchronize the user’s tasks with Cloud Firestore
- In part 3, we will implement Sign in with Apple to turn the application into a real multi-user application
If that sounds good to you, let’s get started!
Getting Started
The source code for the application is available in this Github repository, with the various stages of the application being tagged accordingly. If you want to follow along, feel free to check out the repository - I will indicate which branch / tag we’re at, so you can compare your implementation with mine.
To get started, clone the repository, and look around the checked out folder:
- The
starterfolder contains a Single View application that has been cleaned up a bit, as well as a nice-looking application icon. - The
finalfolder contains the finished version of the project, as well as all intermediate steps
You can follow along by either writing your own implementation in the starter folder, or checking out the individual checkpoints in the final folder.
Data Model
If you’re following along, check out the tag stage_1/data-model/start and open MakeItSo.xcodeproj in the final folder
As mentioned above, we will deliberately implement a simplified version of the iOS Reminders app to better be able to focus on the core concepts. For example, our implementation will only support one list of tasks (the iOS Reminders app supports multiple lists and navigating between them).
Thus, our data model is very simple:
- Our application will manage a single task list
Each task has
- a title (i.e. indicating what the user needs to do)
- a priority (high, medium, low)
- a flag indicating whether the task is completed or not
Here is the code for our data model:
// File: Models/Task.swift
enum TaskPriority {
case high
case medium
case low
}
struct Task: Identifiable {
var id: String = UUID().uuidString
var title: String
var priority: TaskPriority
var completed: Bool
}
#if DEBUG
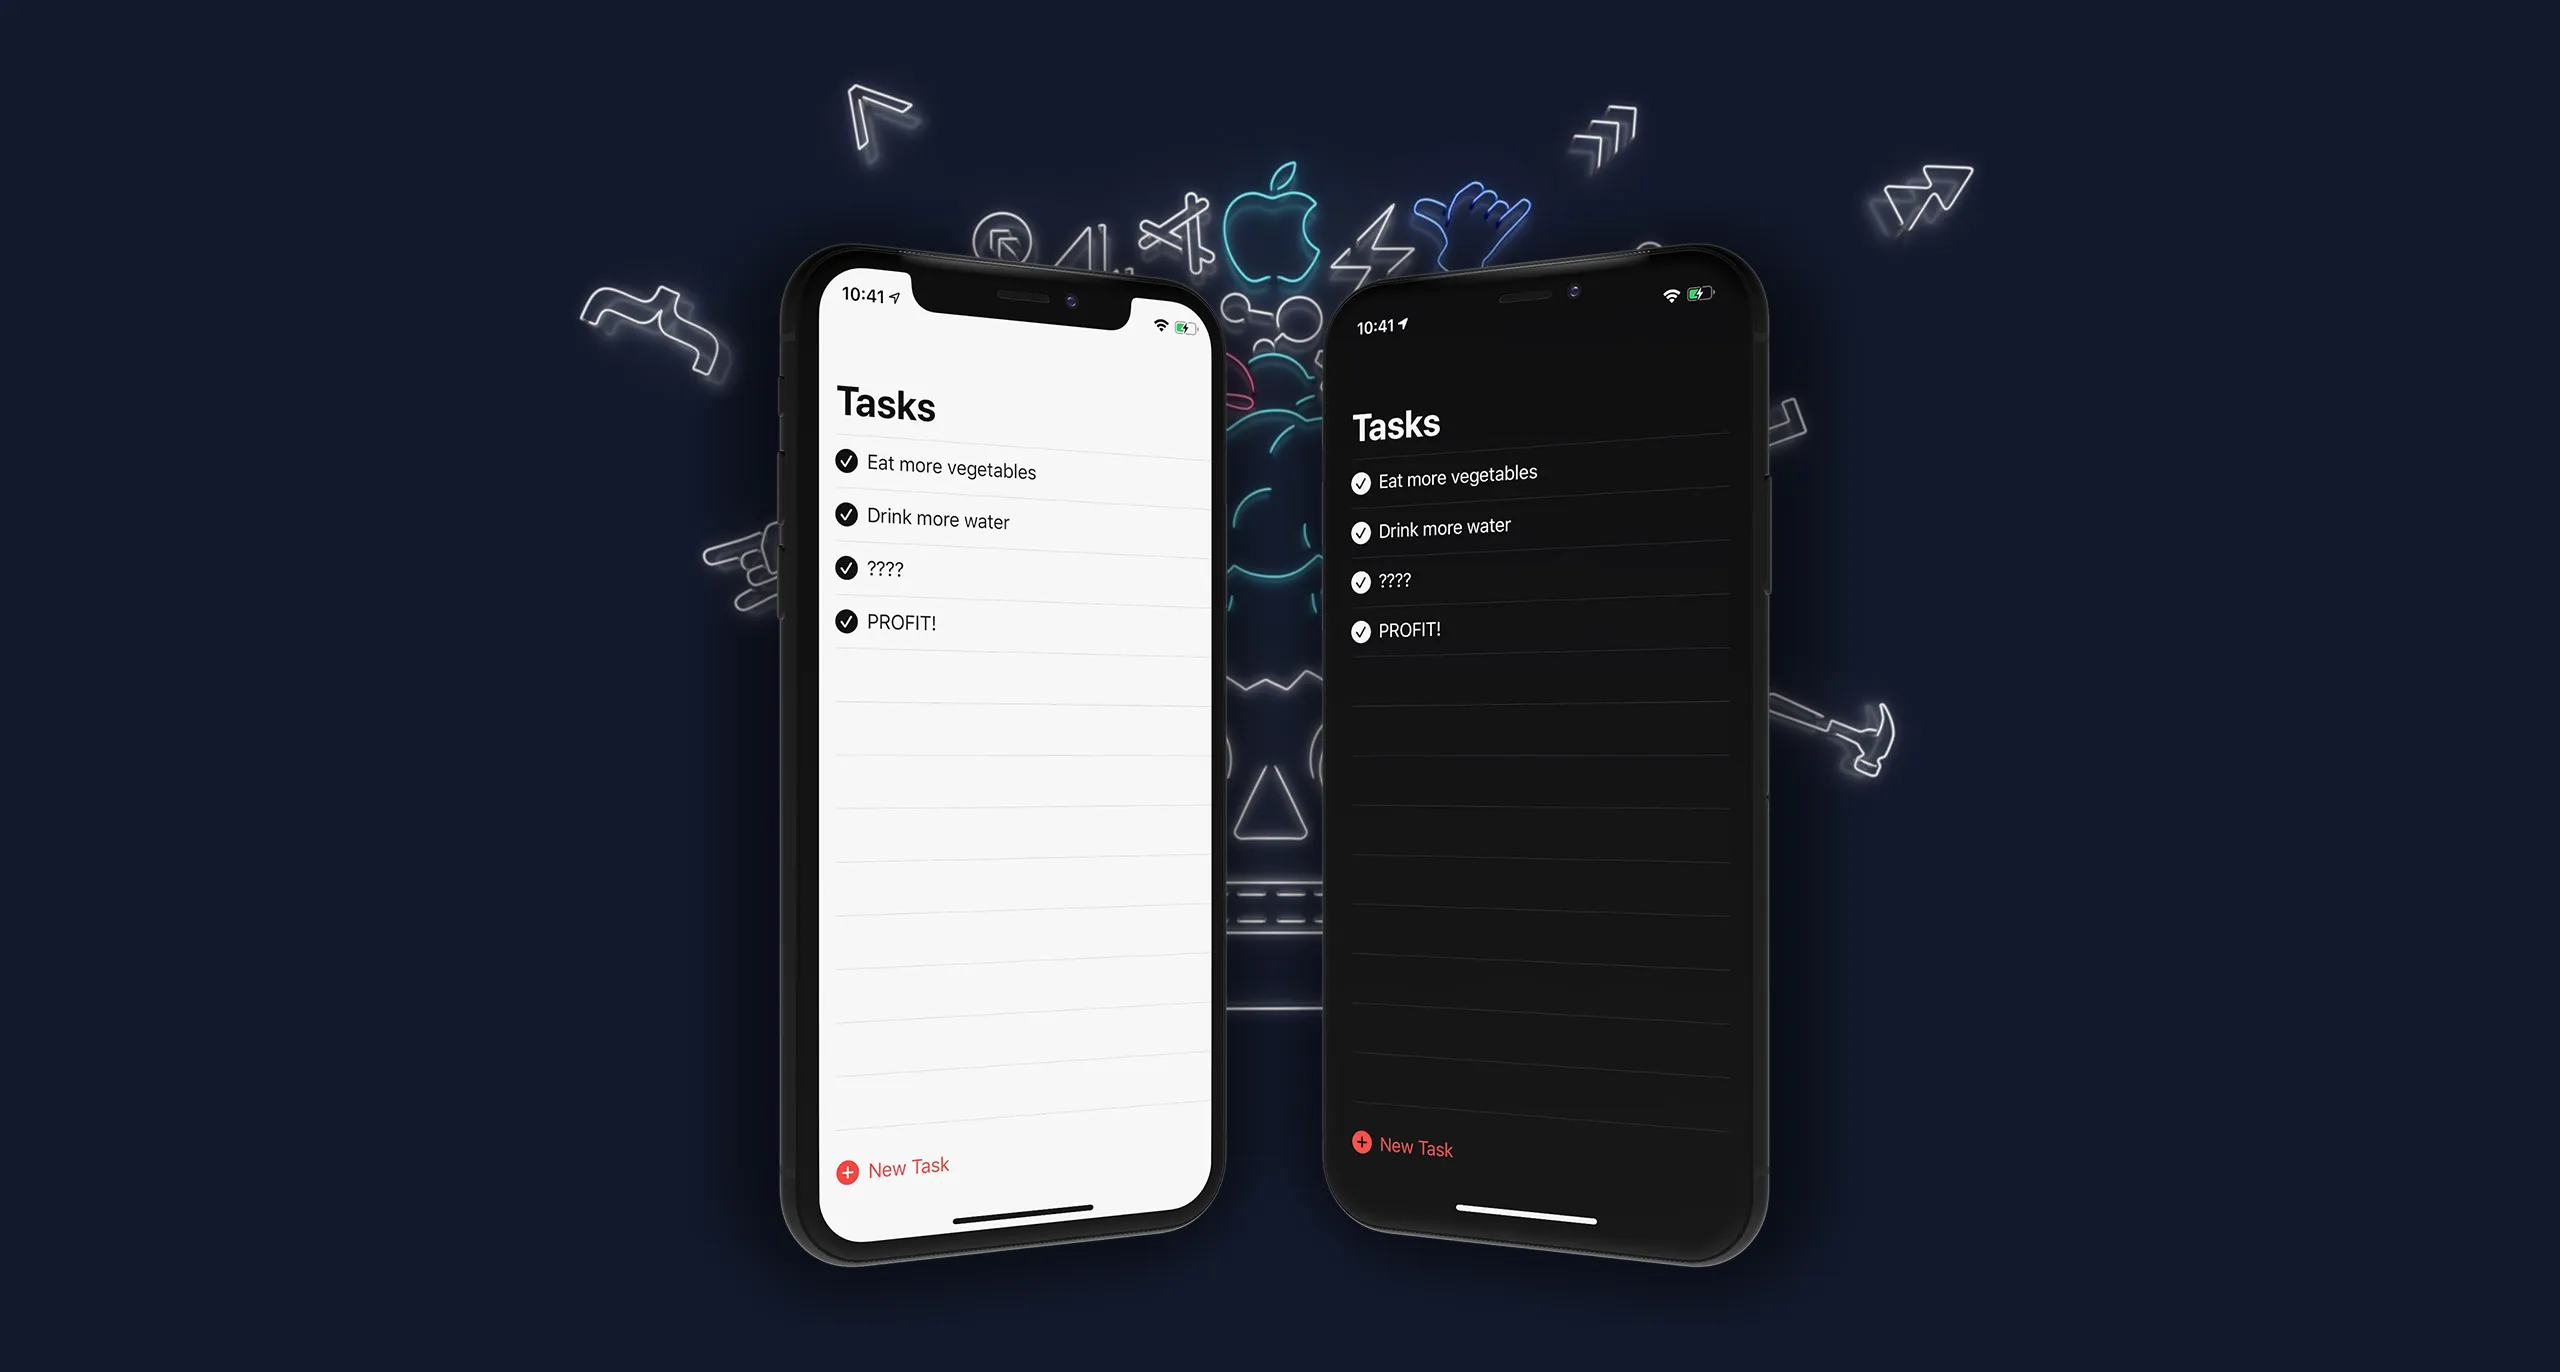
let testDataTasks = [
Task(title: "Implement UI", priority: .medium, completed: false),
Task(title: "Connect to Firebase", priority: .medium, completed: false),
Task(title: "????", priority: .high, completed: false),
Task(title: "PROFIT!!!", priority: .high, completed: false)
]
#endifA couple of things to note:
- We made the
TaskstructIdentifiable, and also added anidattribute. This is necessary, as we will be displaying the tasks in a SwiftUIList, which requires its items to beIdentifiable. UsingUUIDmakes sure each task will get a unique identifier. - We defined a collection with test data, which we can use to drive development of the UI until we actually connect to some data source.
Building a Task List View
If you’re following along, check out the tag stage_1/build_task_list/start and open MakeItSo.xcodeproj in the final folder
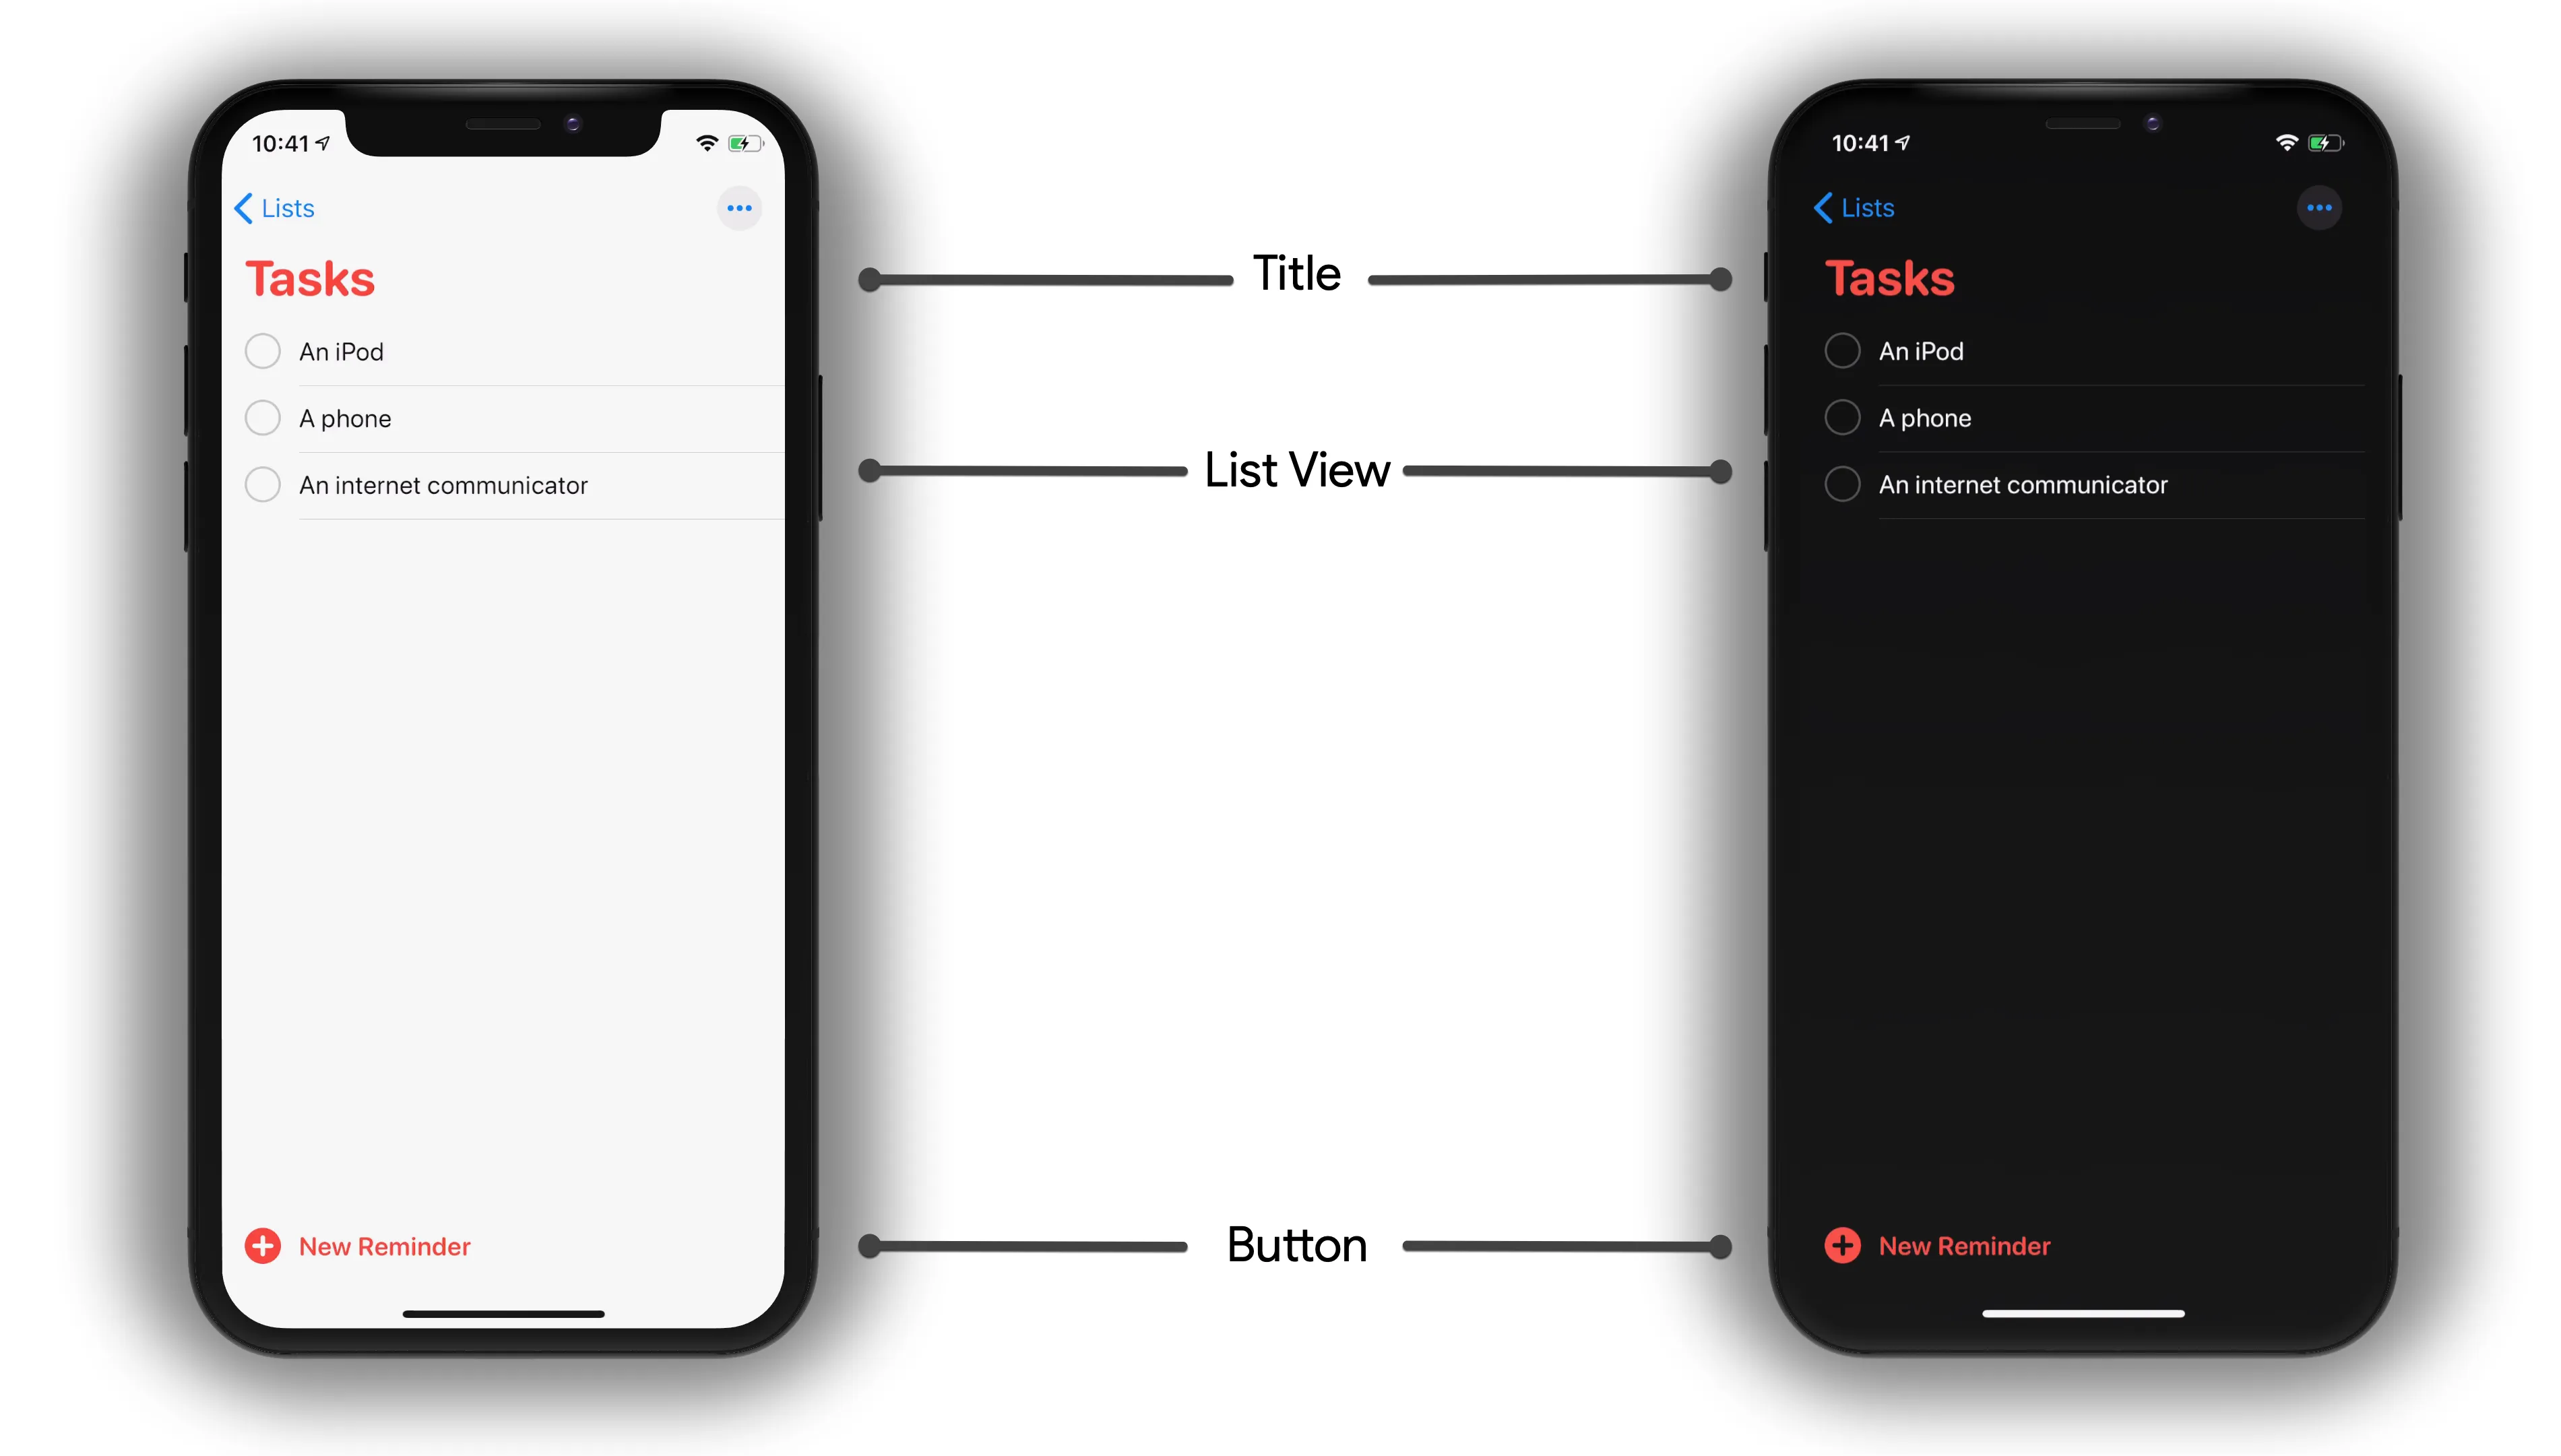
Before we set out to build the task list view ourselves, let’s take a look at the iOS Reminders app. Looking at the main list view interface, we can see three main UI elements:
- The list title (“Tasks” in this example)
- The list view
- A button to add new tasks
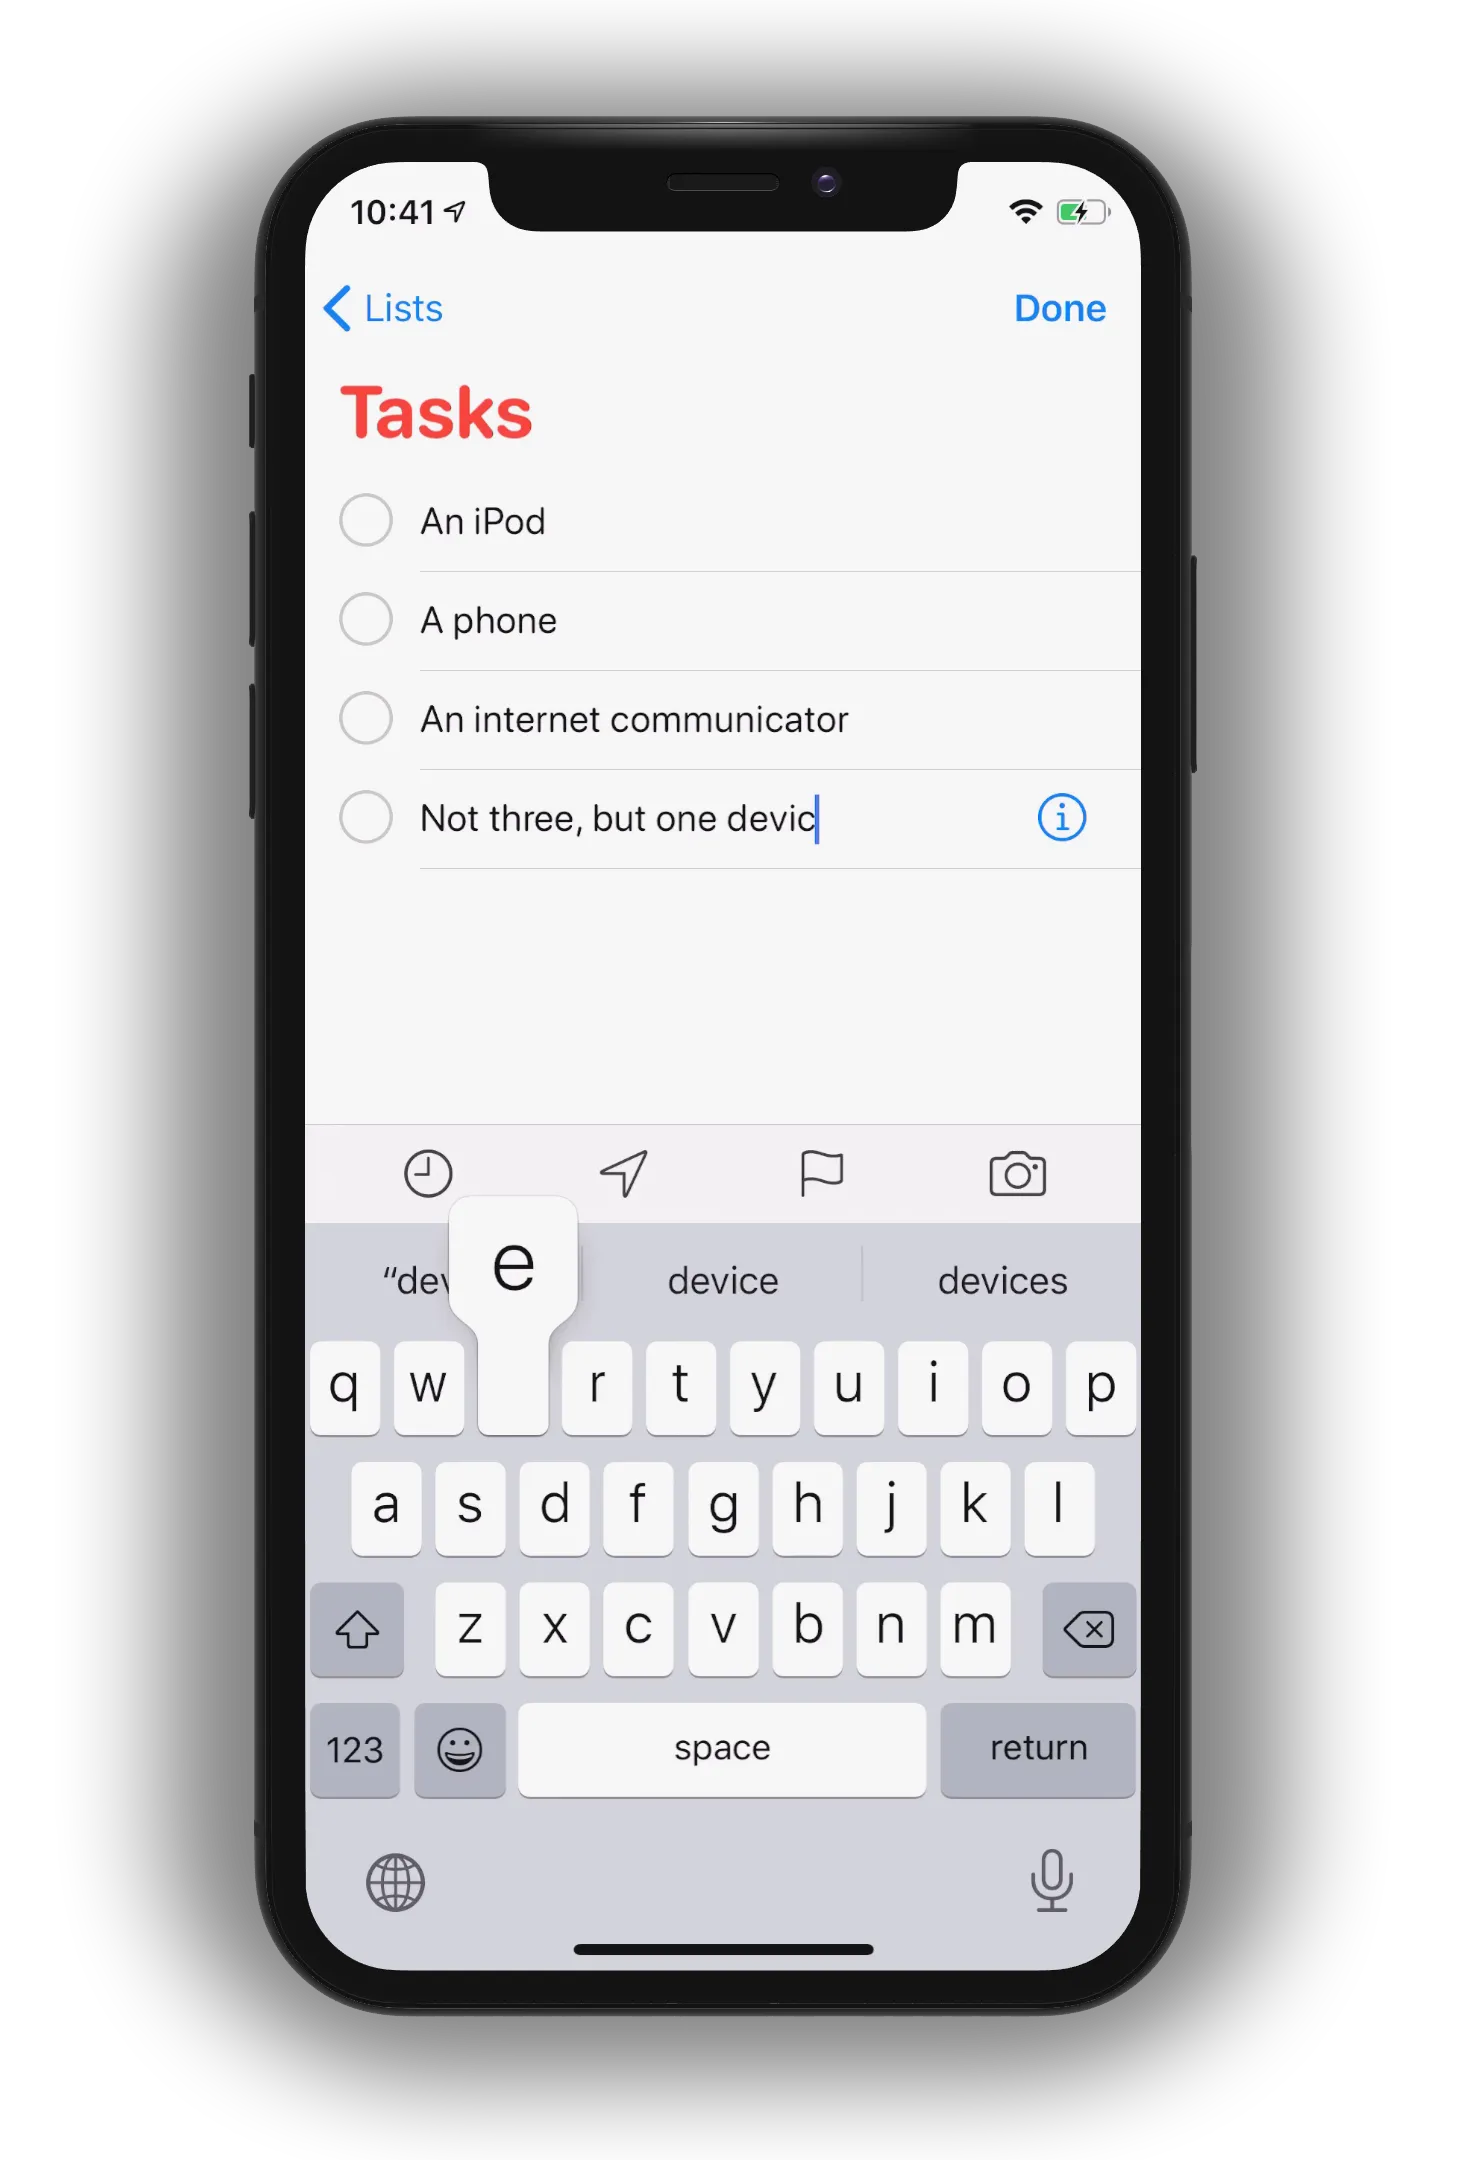
You can also add new items by tapping in the blank area just below the last item, which will add a new, empty line to the list view, with the cursor waiting for you in the text field, ready to receive your new task. The same inline editing UX is used for changing items: tap on a task and start typing to make your changes. This UX pattern is really neat, as it allows the user to see the item they’re currently editing in the context of the other items on the list:
Recreating this layout with SwiftUI is more or less straightforward - let’s look at how it’s done:
// File: Views/TaskListView.swift

import SwiftUI

struct TaskListView: View {
  var tasks: [Task] = testDataTasks 1


  var body: some View {
    NavigationView { 2
      VStack(alignment: .leading) {
        List {
          ForEach (self.tasks) { task in 3
            TaskCell(task: task) 6
          }
          .onDelete { indexSet in 4
             // The rest of this function will be added later
          }
        }
        Button(action: {}) { 7
          HStack {
            Image(systemName: "plus.circle.fill") 8
              .resizable()
              .frame(width: 20, height: 20) 11
            Text("New Task") 9
          }
        }
        .padding()
        .accentColor(Color(UIColor.systemRed)) 13
      }
      .navigationBarTitle("Tasks")
    }
  }
}

struct TaskListView_Previews: PreviewProvider {
  static var previews: some View {
    TaskListView()
  }
}

struct TaskCell: View { 5
  var task: Task

  var body: some View {
    HStack {
      Image(systemName: task.completed ? "checkmark.circle.fill" : "circle")
        .resizable()
        .frame(width: 20, height: 20) 12
      Text(task.title)
    }
  }
}
You will notice that we are using the test tasks (1) from our data model which - thanks to Xcode’s Preview Canvas - gives us the nice benefit of being able to see some data in our UI while we’re building it.
Let’s look at a couple of interesting aspects of the code:
- The entire view is wrapped in a
NavigationView(2), which lets us set the view title using.navigationBarTitle() - Instead of iterating over our collection of tasks with
List(self.tasks), we use a nestedForEach(3), the reason being that.onDelete()is only available onForEach - Speaking of which,
onDelete()(4) enables delete mode on the list, which lets users swipe left on a cell to reveal the delete action. Unfortunately, SwiftUI doesn’t (yet) support any other contextual actions - my guess is that Apple wanted to use some extra time to hone out the DSL for adding contextual actions to lists. - The cells for each of the tasks have already been extracted into a separate view,
TaskCell(5), which makes the call site (6) much cleaner - The button (7) for adding a new task consists of two subviews: an image of a plus sign (8), and the text “New Task” (9). This is a great example of how SwiftUI promotes composable UIs.
- To make sure the checkboxes (which are SF Symbol icons) and the plus sign provide large enough touch targets, we make the icons resizable and change their frame to 20 x 20 pixels (11) and (12).
- Finally, we add some padding and use an accent color to tint the button red (13). Using a system color makes sure this looks great both in light and dark mode (read this article for more background about how to implement dark mode in your apps). I wasn’t able to figure out a way to also tint the navigation bar title - if you find out how to achieve this, please file a pull request on the repo!
And with that, we’ve got the basic version of our UI in place. As always, you can run the app on the Simulator or on a physical device to see it in action, but thanks to SwiftUI’s Preview, we don’t need to do that! In fact, I was able to enjoy a preview of the UI while building it, thanks to our test data and Xcode’s SwiftUI Preview Canvas (that’s rather a mouthful):

To quickly open the preview pane, press ⌥ + ⌘ + ↩. If the preview says “Automatic preview updating paused”, press ⌥ + ⌘ + P to resume. For more Xcode keybindings, see Essential Xcode Shortcuts for More Efficient Coding.
When running the application (or using Live Preview), you will notice that it’s not yet very functional - for example, nothing happens when you try to add a new task, and even tapping one of the checkboxes doesn’t mark the task as completed.
So let’s change that now and implement the business logic of our application!
Application Architecture
Before we go any further, let’s take a moment to think about the architecture for our application. While it’s certainly possible to build SwiftUI views that also contain business logic, this approach easily results in code that is not only hard to read, but virtually untestable.
Thankfully, SwiftUI’s declarative nature lends itself to a functional reactive approach, which, backed by an MVVM (Model, View, ViewModel) architecture, will result in easy-to-read, well-testable code. For a good overview of different architecture patterns for SwiftUI, including an in-depth discussion of MVVM, check out SwiftUI Architectures: Model-View, Redux & MVVM.
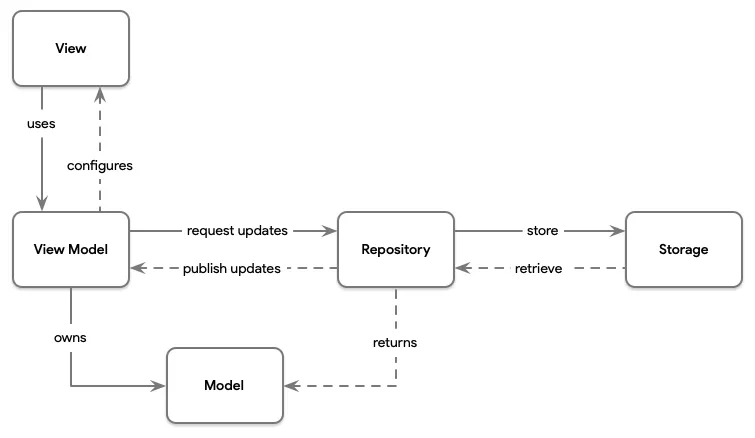
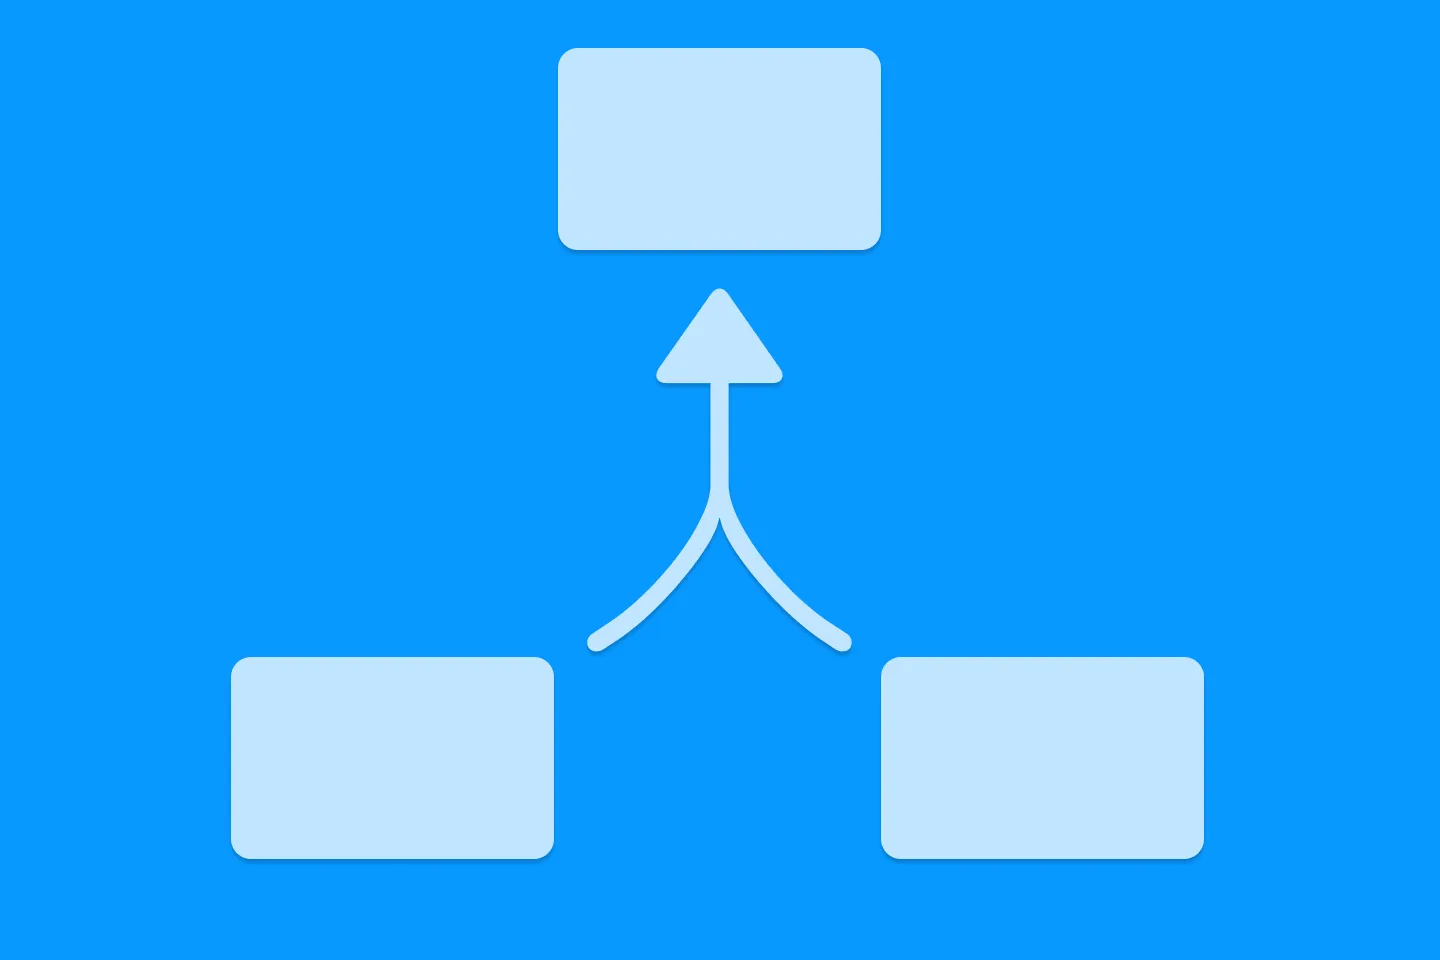
In addition to the views and models or our application, we will need some view models and repositories:
- Views are responsible for displaying data and handling user interaction
- ViewModels are responsible for providing data to the views and turning user interactions into update requests for the data repositories
- Models hold the data that the app operates on. They are transferred back and forth between the view models and the repositories.
- Repositories provide an abstraction for the data layer, making it easy to swap out a local storage for a cloud-based storage
The relationships between all of the above can be seen in the following diagram:
Implementing View Models
If you’re following along, check out the tag stage_2/implement_view_models/start and open MakeItSo.xcodeproj in the final folder.
MVVM calls for a 1:1 relationship between views and view models: each view has one view model that all the UI elements are bound to and which will handle any user interaction taking place on this particular screen.
It might seem a bit surprising at first when I tell you that we will need to implement two different view models for our application: TaskListViewModel and TaskCellViewModel. This is due to the fact that each row in the list view also doubles as an editor view for the respective underlying model element. So - TaskListViewModel is the view model for the list itself, whereas TaskCellViewModel is the view model for the individual list view rows (or rather, cells).
All talk is cheap, let’s look at some code!
Here is TaskListViewModel:
// File: TaskListViewModel.swift

import Foundation
import Combine

class TaskListViewModel: ObservableObject { 1
  @Published var taskCellViewModels = [TaskCellViewModel]() 3

  private var cancellables = Set<AnyCancellable>()

  init() {
    self.taskCellViewModels = testDataTasks.map { task in 2
      TaskCellViewModel(task: task)
    }
  }

  func removeTasks(atOffsets indexSet: IndexSet) { 4
    taskCellViewModels.remove(atOffsets: indexSet)
  }

  func addTask(task: Task) { 5
    taskCellViewModels.append(TaskCellViewModel(task: task))
  }
}
And here is TaskCellViewModel:
// File: TaskCellViewModel.swift

import Foundation
import Combine

class TaskCellViewModel: ObservableObject, Identifiable  { 6
  @Published var task: Task

  var id: String = ""
  @Published var completionStateIconName = ""

  private var cancellables = Set<AnyCancellable>()

  static func newTask() -> TaskCellViewModel {
    TaskCellViewModel(task: Task(title: "", priority: .medium, completed: false))
  }

  init(task: Task) {
    self.task = task

    $task 8
      .map { $0.completed ? "checkmark.circle.fill" : "circle" }
      .assign(to: \.completionStateIconName, on: self)
      .store(in: &cancellables)

    $task 7
      .map { $0.id }
      .assign(to: \.id, on: self)
      .store(in: &cancellables)

  }

}
A few notes:
- Both view models implement
ObservableObject(1), so we can bind them to SwiftUI elements and make sure the UI reacts to any changes to the view models. This is SwiftUI’s superpower: no need to manually synchronise your UI with the underlying data model. I can’t overstate the importance of this aspect. - In a later step, we will connect to local storage (and then, to Firestore), but for the time being, we’ll use the test data defined in
testDataTasks(2). Using themap()method, we convert theTaskmodels in this collection intoTaskCellViewModels. The array containing these converted view models,taskCellViewModels(3), is annotated as@Published, which allows us to bind theListon theTaskListViewto it. - To further help decouple the UI from the underlying models, we also add two methods for adding and removing tasks -
addTask(5) andremoveTask(4). - The individual rows in the
TaskListVieware backed byTaskCellViewModels. As SwiftUI requires items in aListview to beIdentifiable, we have to implement this protocol (6) and provide anidattribute. The value of theidattribute will be updated whenever thetaskattribute is changed. To make this possible, we annotate thetaskattribute as@Published, and subscribe to it (7) in the constructor. - Similarly, we update the name for the icon that represents the completion status of the task by subscribing to the
taskproperty and mapping itscompletedproperty to the respective image name (8).
Binding the View Models
We’re now ready to bind the view models to our UI and hook up any UI actions, such as deleting or adding a new item, as well as updating the underlying tasks when editing a cell or tapping on a row’s checkbox.
Let’s first look at the updated implementation of TaskCell to understand what needs to change:
// File: Views/TaskListView.swift

struct TaskCell: View {
  @ObservedObject var taskCellVM: TaskCellViewModel 1
  var onCommit: (Result<Task, InputError>) -> Void = { _ in } 5

  var body: some View {
    HStack {
      Image(systemName: taskCellVM.completionStateIconName) 2
        .resizable()
        .frame(width: 20, height: 20)
        .onTapGesture {
          self.taskCellVM.task.completed.toggle()
        }
      TextField("Enter task title", text: $taskCellVM.task.title, 3
                onCommit: { 4
                  if !self.taskCellVM.task.title.isEmpty {
                    self.onCommit(.success(self.taskCellVM.task))
                  }
                  else {
                    self.onCommit(.failure(.empty))
                  }
      }).id(taskCellVM.id)
    }
  }
}

enum InputError: Error {
  case empty
}
There are quite a few changes, so let’s walk through them one at a time:
- It shouldn’t come as a surprise that we’ll bind all subviews of
TaskCellto aTaskCellViewModel, hence we refactored thetaskproperty totaskCellVM. - Instead of polluting our views with business logic to compute view state, we bind the view properties to the respective view model properties. For example, we fetch the icon name for the completed status image from
taskCellVM.completionStateIconName(2). - Maybe the biggest change is that we’ve exchanged the
Textview we’ve been using to display the task title for aTextField(3). This allows the user to edit a task title by tapping a cell and starting to type, which is quite convenient.
In terms of handling user interactions, there are a couple of obvious changes, but also a few that require a bit more explanation. Let’s start with a simple one:
- To allow the user to mark a task as complete, we need to handle taps on the image view (by adding an
onTapGesturecallback). We can then simply toggle the completed state on the view model.
As mentioned before, the user can edit the task title by tapping into the respective TextField and starting to type. The changes will be reflected both on the local view model (taskCellVM), and in the array containing it in the parent view’s view model. So what’s the reason for implementing onCommit (4) on the TextField, and why do we forward this to our own onCommit handler (5)?
To answer this question, let’s take a look at the updated implementation of TaskListView:
// File: Views/TaskListView.swift

struct TaskListView: View {
  @ObservedObject var taskListVM = TaskListViewModel() 7
  @State var presentAddNewItem = false

  var body: some View {
    NavigationView {
      VStack(alignment: .leading) {
        List {
          ForEach (taskListVM.taskCellViewModels) { taskCellVM in 8
            TaskCell(taskCellVM: taskCellVM) 1
          }
          .onDelete { indexSet in
            self.taskListVM.removeTasks(atOffsets: indexSet)
          }
          if presentAddNewItem { 5
            TaskCell(taskCellVM: TaskCellViewModel.newTask()) { result in 2
              if case .success(let task) = result {
                self.taskListVM.addTask(task: task) 3
              }
              self.presentAddNewItem.toggle() 4
            }
          }
        }
        Button(action: { self.presentAddNewItem.toggle() }) { 6
          HStack {
            Image(systemName: "plus.circle.fill")
              .resizable()
              .frame(width: 20, height: 20)
            Text("New Task")
          }
        }
        .padding()
        .accentColor(Color(UIColor.systemRed))
      }
      .navigationBarTitle("Tasks")
    }
  }
}
Let me draw your attention to two locations in this class: first, the place where we use TaskCell to render as a normal cell within the List view (1). Nothing special is going on here - we’re just using a plain TaskCell here.
However, a little bit further down (2), a whole bunch of things are going on:
- Most prominently, the cell now has a trailing closure which receives a
Result. - If the result is a
success, we extract aTaskfrom the result in order to add a newTaskCellViewModel(3) to the view model holding all the task cell view models. - Any other cases will be silently ignored. If you go back to the implementation of
TaskCell, you will see that the only other case isempty, which we will send in case the user didn’t enter any text. - Finally, we toggle
presentAddNewItem(4) - this is a flag that guards (5) the visibility of the entire block and will be toggled (6) whenever the user taps the “New Task” button.
If you look closely, you will notice that this entire block is wrapped inside the List, meaning that whenever the user taps the “New Task” button, we will add a new, empty cell to the end of the list. This is the cell the user can use to add a new task with.
Going back to the question of why we need the onCommit callback: this is required because we only want to add a new Task when the user taps the enter key on their keyboard.
To round things off, you will see that we create a TaskListViewModel (7), annotated as an @ObservedObject which allows us to bind the List view to its taskCellViewModels property (8).
If you run the app now, you will notice that the UI is mostly functional: you can add new tasks, modify existing tasks, and mark tasks as completed. However, your changes aren’t persisted: every time you restart the app, you’re back to the hardcoded demo data.
To fix this, we need to implement a persistence layer (we’re working our way down from the UI to the disk…).
Keeping Tasks in a Repository
If you’re following along, check out the tag stage_2/implement_repository/start and open MakeItSo.xcodeproj in the final folder.
To persist the user’s tasks across app launches, we’re going to implement a repository. A repository serves as an abstraction for the persistence layer - this will make it easier for us to choose different technologies for storing our data. For example, we will first store the user’s data on disk, and then implement a repository that connects to Firebase and lets us store data in Cloud Firestore. As an intermediate step, we’re going to implement a TestDataTaskRepository, to retrieve data from our array of test data (and also write back to it).
Along the way, we will look at dependency injection and how it can help us to write more flexible and maintainable code.
Without further ado, here is the code for TestDataTaskRepository:
// File: Repositories/TaskRepository.swift

import Foundation

class BaseTaskRepository {
  @Published var tasks = [Task]()
}

protocol TaskRepository: BaseTaskRepository {
  func addTask(_ task: Task)
  func removeTask(_ task: Task)
  func updateTask(_ task: Task)
}

class TestDataTaskRepository: BaseTaskRepository, TaskRepository, ObservableObject {
  override init() {
    super.init()
    self.tasks = testDataTasks
  }

  func addTask(_ task: Task) {
    tasks.append(task)
  }

  func removeTask(_ task: Task) {
    if let index = tasks.firstIndex(where: { $0.id == task.id }) {
      tasks.remove(at: index)
    }
  }

  func updateTask(_ task: Task) {
    if let index = self.tasks.firstIndex(where: { $0.id == task.id } ) {
      self.tasks[index] = task
    }
  }
}
As you can see, the TaskRepository protocol defines a couple of methods to add, remove, and update tasks. The tasks themselves are held in an array of Tasks, which is @Published, so that our clients can easily subscribe to any updates. In TestDataTaskRepositorys initialiser, we fetch the actual test data. Obviously, any changes we make to the array of tasks are not going to be persisted anywhere - to change this, we’re going to provide an implementation of TaskRepository that is capable of reading and writing from / to disk.
But before we can do that, we need to talk about dependency injection.
Dependency Injection
Comparing the architecture diagram with the code we’ve got so far, it becomes obvious that we need to access the TaskRepository from both of our view models. This is easier said than done, as the repository is stateful: it holds a collection of our tasks. If we’d create an instance of the task repository in each of our views, we’d quickly run out of sync.
One way to resolve this situation is to make the repository a singleton. A lot has been said and written about singletons, and while there is nothing wrong with using singletons (Apple does it, too), I’d like to take a different approach here and use dependency injection, because it will give us some nice benefits.
One of the most elegant and lightweight dependency injection frameworks for Swift is Resolver by Michael Long, so let’s add it to our project! You can either do this using Swift Package Manager, Carthage, or CocoaPods. As we’ll need to add Firebase to our project as well at a later stage, let’s choose CocoaPods (at the time of this writing, Firebase only supports CocoaPods and Carthage, with support for SPM being worked on).
Using Resolver is straightforward, and requires only three changes to our project:
First, we’ll have to add it to the project using CocoaPods:
target 'MakeItSo' do
  use_frameworks!

  pod 'Resolver'
end
If you’re following along, don’t forget to run pod install in your project folder to install Resolver. After CocoaPods has finished installing Resolver and its dependencies, close the project in Xcode and open the workspace CocoaPods has created for you. Pro tip: run xed . in the project folder - this will either open the project, or the workspace (depending on which one exists).
Next, we need to register any classes we want to inject somewhere else. To do this, Resolver provides a convenient extension that we can hook into:
// File: AppDelegate+Resolving.swift

extension Resolver: ResolverRegistering {
  public static func registerAllServices() {
    register { TestDataTaskRepository() as TaskRepository }.scope(application)
  }
}
This code essentially says “create an instance of TastDataTaskRepository and inject it whereever a Taskrepository instance is required”.
And finally, our view models need to be updated. Let’s look at TaskViewModel to understand the changes:
// File: TaskListViewModel.swift

import Foundation
import Combine
import Resolver

class TaskListViewModel: ObservableObject {
  @Published var taskRepository: TaskRepository = Resolver.resolve()
  @Published var taskCellViewModels = [TaskCellViewModel]()

  private var cancellables = Set<AnyCancellable>()

  init() {
    taskRepository.$tasks.map { tasks in
      tasks.map { task in
        TaskCellViewModel(task: task)
      }
    }
    .assign(to: \.taskCellViewModels, on: self)
    .store(in: &cancellables)
  }

  // ...
As you can see, we ask Resolver to provide an implementation for TaskRepository by calling Resolver.resolve(), after which we can use the taskRepository property just like a regular property.
With this in place, using a different implementation of TaskRepository in our app is now a matter of changing the registration from register { TestDataTaskRepository() as TaskRepository }.scope(application) to register { SomeOtherTaskRepository() as TaskRepository }.scope(application) - it’s as easy as that - no need to touch any other code!
Persistence pays off
If you’re following along, check out the tag stage_2/implement_disk_repository/start and open MakeItSo.xcworkspace in the final folder.
For the grand finale, let’s build a TaskRepository implementation that persists tasks on disk. To help keep our code as clean as possible, I decided to use Disk, a nice little framework that abstracts access to the iOS file system. It supports Codable, so reading and writing from / to disk can be done in as little as one line of code. Have a look for yourself:
// File: Repositories/TaskRepository.swift

class LocalTaskRepository: BaseTaskRepository, TaskRepository, ObservableObject {
  override init() {
    super.init()
    loadData()
  }

  func addTask(_ task: Task) {
    self.tasks.append(task)
    saveData()
  }

  func removeTask(_ task: Task) {
    if let index = tasks.firstIndex(where: { $0.id == task.id }) {
      tasks.remove(at: index)
      saveData()
    }
  }

  func updateTask(_ task: Task) {
    if let index = self.tasks.firstIndex(where: { $0.id == task.id } ) {
      self.tasks[index] = task
      saveData()
    }
  }

  private func loadData() {
    if let retrievedTasks = try? Disk.retrieve("tasks.json", from: .documents, as: [Task].self) { 1
      self.tasks = retrievedTasks
    }
  }

  private func saveData() {
    do {
      try Disk.save(self.tasks, to: .documents, as: "tasks.json") 2
    }
    catch let error as NSError {
      fatalError("""
        Domain: \(error.domain)
        Code: \(error.code)
        Description: \(error.localizedDescription)
        Failure Reason: \(error.localizedFailureReason ?? "")
        Suggestions: \(error.localizedRecoverySuggestion ?? "")
        """)
    }
  }
}
Most of this code should be familiar to you by now, the only differences are some calls to saveData() and loadData(). Reading a collection of Codable objects from disk is a one-liner with Disk: try? Disk.retrieve("tasks.json", from: .documents, as: [Task].self). Storing data isn’t much more complicated as well: try Disk.save(self.tasks, to: .documents, as: "tasks.json").
It’s worth noting that we’ll have to update the code in TaskListViewModel a bit to reflect the fact that our view model will get updated automatically when making changes to the repository:
// File: ViewModels/TaskListViewModel.swift

class TaskListViewModel: ObservableObject {
  @Published var taskRepository: TaskRepository = Resolver.resolve()
  @Published var taskCellViewModels = [TaskCellViewModel]()

  private var cancellables = Set<AnyCancellable>()

  init() {
    taskRepository.$tasks.map { tasks in
      tasks.map { task in
        TaskCellViewModel(task: task) 2
      }
    }
    .assign(to: \.taskCellViewModels, on: self)
    .store(in: &cancellables)
  }

  func removeTasks(atOffsets indexSet: IndexSet) {
    // remove from repo
    let viewModels = indexSet.lazy.map { self.taskCellViewModels[$0] }
    viewModels.forEach { taskCellViewModel in
      taskRepository.removeTask(taskCellViewModel.task) 1
    }
  }

  func addTask(task: Task) {
    taskRepository.addTask(task)
  }
}
So instead of removing a task from the repository, and then also removing it from the local taskCellViewModels collection, we just need to remove it from the repository. This will trigger the subscriber we set up in the initialiser (2), which will duly transform the input models into view models. The same applies to adding new tasks: just add them to the repository, the subscriber will automatically update the local collection of view models.
Finish line
If you’re following along, check out the tag stage_2/finish_line and open MakeItSo.xcworkspace in the final folder.
It’s now time to run the application and enjoy the results of our hard work (it wasn’t actually that hard, was it). Go ahead and hit that Run button to launch the app on your Simulator or your phone, and add some tasks!
With very little code, we were able to build a fully functional task list application. In the next part of this series, we’re going to look at how to connect the application to Firebase to persist our data in Cloud Firestore.
Homework
As a little challenge while you wait for the next article in this series, why don’t you try to implement support for task priorities?
The iOS Reminders app displays exclamation marks to the left of the task title to indicate a task’s priority. Changing the task priority is a bit less discoverable: you’ll need to tap on the info icon of a task to open its details screen, scroll down a little bit, and then choose the desired task priority from a picker.
Feel free to implement this behaviour, or come up with your own solution.
If you’d like to showcase your implementation, do the following:
- Fork the repository
- Check out the stage 2 finish line tag
- Implement your solution
- Send a PR
- (optional) tweet a link to your PR as a reply to this tweet
I will then go through the solutions and re-tweet the ones that are the most creative.
Thanks for reading, and have fun implementing the homework challenge!
Resources
- Source code for the sample app
- Supporting Dark Mode in Your Interface
- Modern Dependency Injection in Swift
- SwiftUI Architectures: Model-View, Redux & MVVM
- MVVM with SwiftUI and Combine
- Resolver on Github
- Disk on Github

Reverse-Engineering Xcode's Coding Intelligence prompt
A look under the hood
Extracting structured data from PDFs using Gemini 2.0 and Genkit
Understanding SwiftUI Preferences
SwiftUI Parent / Child View Communication
Creating a reusable action menu component in SwiftUI

Creating custom SF Symbols using the SF Symbols app
No Design Skills Needed